Editing a chop point
You can split a sample up into multiple smaller samples. To split a sample, you must first mark the locations where the sample is to be split using chop points (markers).
- Select the Edit Chop checkbox (
 ).
). - In the waveform viewer, right-click at the position you want to add a chop point.
- You can use the followings items in the popup menu to add/delete chop points.
Item | Explanation |
|---|---|
Add Chop | Adds a chop point at the cursor location. |
Remove Chop | Deletes the chop point at the cursor location. |
Remove All | Deletes all chop points. |
Auto Assign | Adds chop points based on certain conditions you specify. |
MEMO
- When “Auto Assign” is selected, the popup menu below is shown.
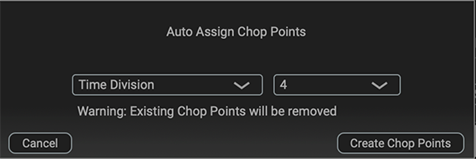
- If you click “Create Chop Points”, the chop points are added based on the conditions you specified.
Parameter | Value | Explanation |
|---|---|---|
TIME DIVISION | 2–16 | Adds chop points by dividing up the sample equally. |
LEVEL | 1–10 | Adds a chop point at the location in the sample where the levels exceed a certain value. |
TRANSIENT | HARD, MID, SOFT | Adds a chop point at the location in the sample where there is a large change in volume, such as when a sound with sharp attack plays. |