Recording samples by looping (LOOPER)
This unit has a looper, which lets you record the sound that’s currently playing back as a sample.
- Set the value of MARK Function parameter to “Looper” by following the steps in “Editing the settings related to this unit (System)”.
MEMO
- Hold down the [SHIFT] button, and press the [VALUE] knob to switch between skip-back sampling and the looper function.
- You can’t use skip-back sampling and the looper function at the same time.
- Press the [MARK] button to switch to looper mode.
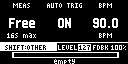
- Configure the parameters for the looper using the following controllers.

Controller
Parameter
Value
Explanation
[CTRL 1] knob
MEAS
Free, 1, 2, 4
Sets the sample length (number of measures).
- With the “Free” setting, you must stop the sampling manually.
- For all of these settings, you can sample up to 16 seconds of audio (depending on the tempo setting).
[CTRL 2] knob
AUTO TRIG
OFF, ON
When this is “ON” and the input audio signal exceeds the level set in the AUTO TRIG parameter, the looper starts recording.
[CTRL 3] knob
BPM
40.0–200.0
Sets the tempo while sampling.
PLAY-RATE
1.0–199.0 (%)
Sets the playback speed while the looper plays back.
[SHIFT] button + [CTRL 1] knob
BUS
DRY, BUS1, BUS2, LOOPER
Sets the bus to which input audio signals are sent (meaning which effects are used).
- When overdubbing in looper mode, this must be set to “LOOPER”. With this setting, effects are not applied to the looper playback audio.
[SHIFT] button + [CTRL 2] knob
Routing
Mix, ExtIn
This selects the source to sample (the input source).
When this is set to “Mix”, the unit samples the mixed audio from this unit (the playback audio) and the input from an external source.
When this is set to “ExtIn”, the unit samples only the audio input from an external device.
[VALUE] knob (turn)
Sets the recording level or the amount of feedback.
- To switch the parameter to configure between Rec Level and Feedback Rate, press the [VALUE] knob.
Rec Level
0–127
Sets the recording level.
Feedback Rate
0–100 (%)
Sets the amount of feedback.
[SHIFT] button + [VALUE] knob (turn)
METRO VOL
0–5
Sets the volume of the metronome.
- Press the [REC] button.
- Sampling begins.
- When you press the [RESAMPLE] button to make it light up before sampling begins, the unit automatically switches to overdubbing mode after recording the first loop pass.
MEMO
You can control the start/stop of recording from an external MIDI device using the start command (FA)/stop command (FC).
- You can use the following controls when sampling with the looper.
Controller
Explanation
[REC] button
Starts/stops sampling.
[RESAMPLE] button
Activates overdubbing mode.
[DEL] button
Deletes the content sampled by the looper.
This is enabled only when the sample is stopped.
[COPY] button
Assigns the sampled data (result) to the pads.
Press pads [1]–[16] to select the save destination pad, and press the [VALUE] knob.
[SHIFT] button + [PATTERN SELECT] button
Undoes (UNDO) the data you just input (recorded).
Operate this again to cancel the undo action (REDO).
This is enabled when the sampled data is played back in a loop or stopped.
[SHIFT] button + [EXIT] button
Press the [EXIT] button quickly four times.
Stops the playback of all samples.
[PITCH/SPEED] button + Pads [1]–[16]
Sets the looper’s tempo as the tempo that was set for the pad sample.
- To finish the looper mode, press the [MARK] button.
MEMO
When the unit is in looper mode, you can operate some of the controls from an external controller by using control change messages.
For details, refer to “*8 Control change message numbers and corresponding controllers in Looper mode”.