Configuring pads that support digital connection (sold separately)
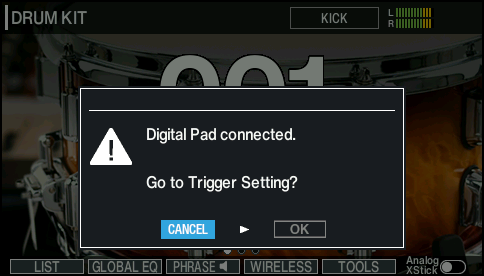
The first time that a separately sold pad that supports digital connection is connected to the DIGITAL TRIGGER IN port, the following screen appears.
Following the onscreen instructions, specify the trigger input to which the connected pad should be assigned.
- If you assign the same trigger input used by a pad connected to a TRIGGER IN jack, the pad that’s connected to that TRIGGER IN jack does not output sound.
- When you execute a factory reset, the connection history and settings of digitally-connected pads are initialized.
- Select “OK” and press the [ENTER] button.
- The TRIGGER - DIGITAL PAD screen appears.

- Use the cursor buttons to select “Assign” for the pad that you want to configure, and use the [-] [+] buttons or the dial to set the assignment.
- You can also select a pad by striking it.
- If you don’t want to assign the pad to any trigger input, choose “N/A”.
- When you select a pad, the selected pad’s button or indicator blinks.

Pad
Assign
PD-14DSX, PD-140DS
SNARE
CY-18DR
RIDE
VH-14D
HI-HAT
- You can’t specify multiple instances of the same assignment.
- Press the [KIT] button to return to the KIT screen.
MEMO
If you want to change the assignment after the setting, set this on the TRIGGER - DIGITAL PAD screen (press the [F2] (DIGITAL) button on the TRIGGER - BANK screen).
The following screen is shown when you connect a digital pad that’s an older version. Update the pad.
If the following screen appears, the pad may not function properly with the V51 until you update its firmware. Follow the steps below to update the pad.
- You can also connect the pad to your computer to update it. For details, refer to the support page for each pad.
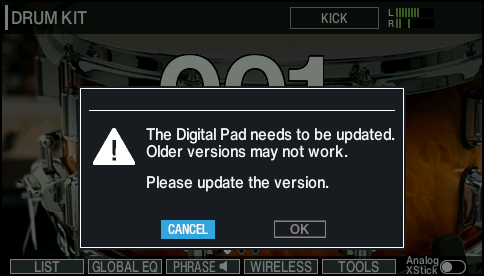
- Select “OK” and press the [ENTER] button.
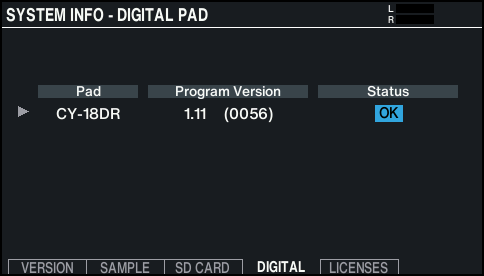
- The SYSTEM INFO - DIGITAL PAD screen appears.
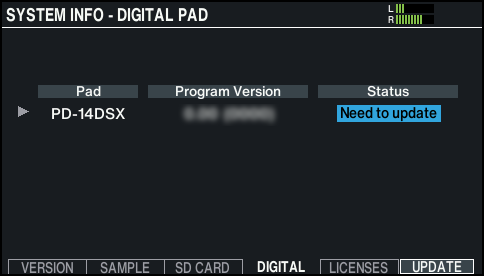
- Position the cursor on “Need to update”, and press the [F6] (UPDATE) button.
- A confirmation message appears.

- If you decide to cancel, select “CANCEL” and press the [ENTER] button.
- Select “OK” and press the [ENTER] button.
- The pad update begins.
- “Complete!” appears. The update is complete if the status reads “OK”.
- The update may take several minutes.
- Never disconnect the digital pads or turn off the power while you see the message “Processing...” on the screen.
- If you unplug a digital pad during the update, or if the update fails due to the power of the V51 being turned off, the V51 may no longer be able to recognize the digital pad. For details on how to deal with this, refer to “When the digital pad isn’t recognized by the V51”.
- Press the [KIT] button to return to the KIT screen.
When the digital pad isn’t recognized by the V51
If you unplug a digital pad during the update, or if the update fails due to the power of the V51 being turned off, the V51 may no longer be able to recognize the digital pad.
Follow the steps below to try updating the digital pad again.
- Press the [SETUP] button.
- Use the cursor buttons to select “SYSTEM INFO”, and press the [ENTER] button.
- Press the [F4] (DIGITAL) button.
- The SYSTEM INFO - DIGITAL PAD screen appears.
- Hold down the [SHIFT] button and press the [F6] (RECOVER) button.
- The DIGITAL PAD RECOVERY screen appears.
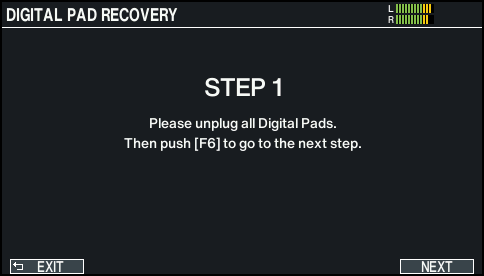
- Remove the digital pads connected to the DIGITAL TRIGGER IN ports.
- Press the [F6] (NEXT) button.
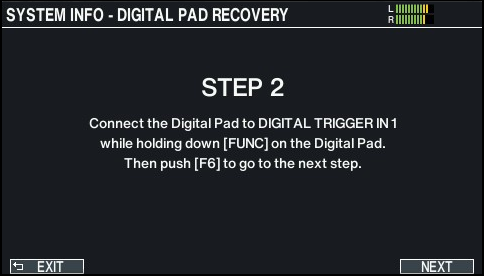
- Connect the digital pad that could not be recognized to the DIGITAL TRIGGER IN port of the V51, while holding down the [FUNC] button on the digital pad.
- Press the [F6] (NEXT) button.
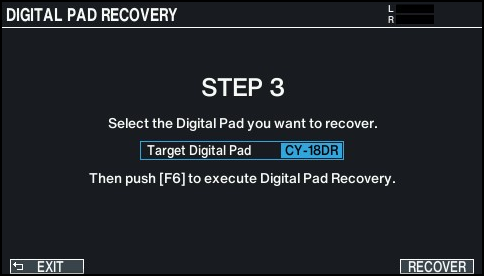
- Select the digital pad that couldn’t be recognized, and press the [F6] RECOVER button.
- A confirmation message appears.
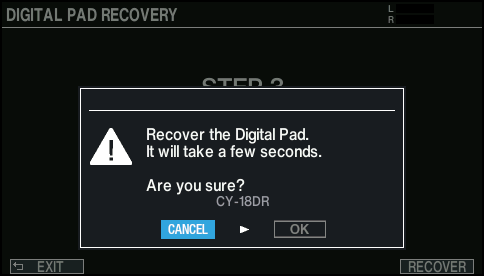
- If you decide to cancel, select “CANCEL” and press the [ENTER] button.
- Select “OK” and press the [ENTER] button.
- The digital pad update begins.
- “Complete!” appears. The update is complete if the status reads “OK”.
- The update may take several minutes.
- Never disconnect the digital pads or turn off the power while you see the message “Processing...” on the screen.