Looper
You can record what you play (up to 38 seconds in mono, and up to 19 seconds in stereo) and make the unit play back the recorded section over and over, as a loop. You can also layer additional performances with the recording as it plays back (overdubbing).
This lets you create real-time backing performances on the fly.
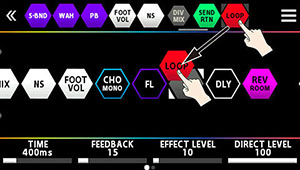
You must place the looper somewhere in the effect chain in order to use it.
Also, you need to assign the looper’s record, play, and overdub functions to the switches you want.
Here’s an example of how you can use the [C1] switch on this unit or an external footswitch connected to CTL 2, 3/EXP 2 jack on this unit, when in up/down mode, to operate the looper.
Placing the looper in the effect chain
- Select the memory with which you want to use the looper.
- Follow the steps in “Effect placement” to place the looper in the effect chain.

Assigning looper functions to switches
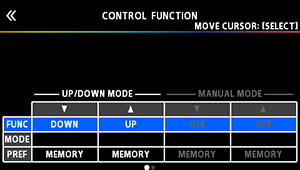
- Follow the steps in “Selecting the control mode” to switch to the up/down mode.
- Follow the steps in “Assigning a function” to display the CONTROL FUNCTION screen.

- Press PAGE [Ë] to show the next page.
- For “CTL 1,” ”CTL 2,” and ”CTL 3,” set FUNCTION as follows.
Parameter | Value | Explanation |
|---|---|---|
CTL 1 | LOOP CTL | Starts recording. Each time you press the switch, operation alternates between playback and overdubbing. Press twice to stop playback. Long-press to erase the recording. |
CTL 2 | LOOP STOP | Stops recording or playback. |
CTL 3 | LOOP CLEAR | Clears the recording. |
Loop playback level setting
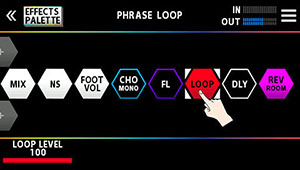
If you set the playback level at 100 (default value), the volume of the performance and that of the loop playback will be identical.
If you set the playback level to a value lower than 100, the volume of the playback will be lower than that of the performance. As a result, the sound of the performance won’t get buried by the loop playback sound, even if you record a multiple number of times.
- Following the steps in “Basic procedure for effect editing”, touch the “LOOP” icon on the effect chain screen.

- Turn the [1] knob to specify the “PLAY LEVEL” value.
Switch color
The switches light up in the following colors when you assign the looper function to a footswitch on this unit.
Color | Status |
|---|---|
Red | Recording |
Orange | Overdubbing |
Green | Playback |
Green (blink) | Stopped (phrase exists) |
Blue | Stopped (no phrase) |
MEMO
When COLOR MODE is set to “TYPE 2”, the switches light up as follows.
Color | Status |
|---|---|
Red | Recording |
Yellow | Overdubbing |
Blue | Playback |
Blue (blink) | Stopped (phrase exists) |
Blue | Stopped (no phrase) |