Adding effects (BUS FX)
Use the six effect buttons and the three knobs to control the BUS 1 and BUS 2 effects.
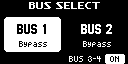
- Press the [BUS FX] button to toggle the bus that controls the effects between BUS 1 and BUS 2.
- When the button is lit orange, BUS 1 is selected; and when the button is blinking orange, BUS 2 is selected.
- Press the effect buttons.
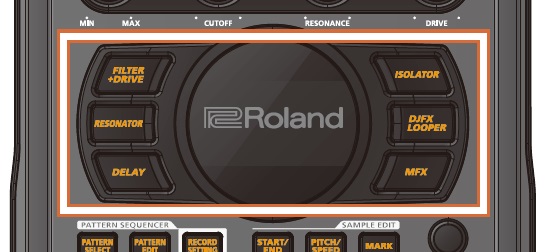
- Press the buttons of the effects you want to apply, including the [FILTER+DRIVE] button, the [RESONATOR] button, the [DELAY] button, the [ISOLATOR] button, the [DJFX LOOPER] button, and the [MFX] button.
- This turns the effects for the selected bus on.
MEMO
- You can use the [MFX] button to quickly and flexibly switch between all of the built-in effects.
Ó “Using the MFX effects” - You can also set the effects you desire for each of the other five buttons ([FILTER+DRIVE]–[DJFX LOOPER] buttons).
Ó “Assigning the desired effect to an effect button (DIRECT FX)” - When you set BUS 1 and BUS 2 to the same effect, the message “Same EFX on other BUS” is shown.
- You can use the [MFX] button to quickly and flexibly switch between all of the built-in effects.
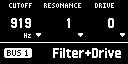
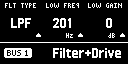
- Use the [CTRL 1]–[CTRL 3] knobs to operate the effect parameters for the selected bus.
- The parameters change how the effects are applied.
MEMO
- Turn the [CTRL 1]–[CTRL 3] knobs while holding down the [VALUE] knob to operate the sub-parameters of the effect.
- Press an effect button while holding down the [REMAIN] button to freeze the effect edit screen view.
Ó “Editing the effects”
- Turn the [CTRL 1]–[CTRL 3] knobs while holding down the [VALUE] knob to operate the sub-parameters of the effect.
- The effect turns off when you press an effect button that’s lit/blinking.
MEMO
- Although the effect buttons normally operate as toggles, they work as momentary switches while you hold down the [VALUE] knob (this is the effect grab function).
Ó “Turning an effect on only while the button is pressed” - Turning off an effect by using the mute bus is an effective performance technique.
Ó “Playing a break in the performance (MUTE BUS)”