Top panel
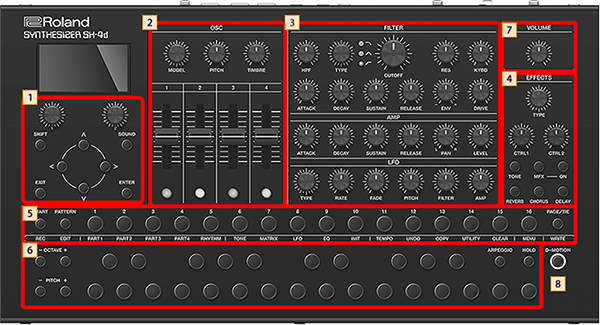
 Control section
Controller | Explanation |
|---|---|
[SOUND] button | Displays the tone list (sound browser) and switches between sounds (tones). When you press this button on the pattern screen, the mixer screen appears. |
[SHIFT] button | When you press the [START], [PATTERN], [1]–[16] or [PAGE/TIE] buttons while holding down the [SHIFT] button, the operation listed below the respective button is executed. For the other buttons, a menu screen or the like corresponding to the button is shown. |
[1] [2] knobs | Selects and sets the items on the screen. On the list screen, use the [1] knob to select the parameter and use the [2] knob to set the value. On the top screen and similar screens, edit the parameters that are shown at the bottom of the screen. On some screens, you can turn a knob while pressing it to change the value in steps of 10. |
[ç] [æ] [ä] [å] buttons | Selects and sets the items on the screen. |
[ENTER] button | Used for confirming a value or executing an operation. |
[EXIT] button | Returns you to the previous screen. In some screens, this cancels the operation currently being executed.
|
 OSC section
Controller | Explanation |
|---|---|
[MODEL] knob | The function changes depending on the currently selected part (current part). For parts 1–4 (tone parts), this switches between oscillator models. For part R (rhythm part), this sets the waveform of the selected rhythm instrument. |
[PITCH] knob | Sets the pitch in semitone units. |
[TIMBRE] button | Changes the tonal quality of the oscillator tone. The functions of these controls change depending on the oscillator model. Ø “Oscillator Model” |
[OSC 1]–[OSC 4] sliders [OSC 1]–[OSC 4] buttons | The functions of these controls change depending on the oscillator model. Ø “Oscillator Model” |
 FILTER/AMP/LFO section
Section | Controller | Explanation | |
|---|---|---|---|
FILTER | [HPF] knob | Sets the cutoff frequency of the -6dB/Oct high-pass filter. | |
[TYPE] knob | Select the filter type. LPF:A -24dB/Oct low-pass filter. This cuts off frequencies above the cutoff frequency. Cutting off the high frequencies makes the sound more mellow. This is the most frequently-used type. BPF:A -12dB/Oct band-pass filter. This cuts off frequencies except for those around the cutoff frequency. This filter type is useful for making sounds with a unique character. HPF:A -24dB/Oct high-pass filter. This cuts off frequencies below the cutoff frequency. This filter type is useful for creating percussion sounds and the like that have a distinctive high end. | ||
[CUTOFF] knob | Sets the cutoff frequency of the filter. | ||
[RES] knob | Emphasizes the frequencies around the filter’s cutoff frequency (resonance). Larger values produce greater emphasis, creating a unique synthesizer-like sound. | ||
[KYBD] knob | Adjusts how much the cutoff frequency changes according to the note you play on the keyboard (key follow). | ||
[ATTACK] knob | Sets the attack time of the filter envelope. | ||
[DECAY] knob | Sets the decay time of the filter envelope. | ||
[SUSTAIN] knob | Sets the sustain level of the filter envelope. | ||
[RELEASE] knob | Sets the release time of the filter envelope. | ||
[ENV] knob | When the cutoff frequency is set to be controlled by the filter envelope, this adjusts how much the cutoff frequency changes. If the knob is in the center, no effect is applied. | ||
[DRIVE] knob | Adjusts how much the filter distorts the signal. | ||
AMP | [ATTACK] knob | Sets the attack time of the amp envelope. | |
[DECAY] knob | Sets the decay time of the amp envelope. | ||
[SUSTAIN] knob | Sets the sustain level of the amp envelope. | ||
[RELEASE] knob | Sets the release time of the amp envelope. | ||
[PAN] knob | Sets the panning of each part’s sound when using stereo output. | ||
[LEVEL] knob | Adjusts the part volume. | ||
LFO | [TYPE] knob | Sets the LFO waveform. SINE:Sine wave TRI:Triangle wave SAW-UP:Sawtooth wave SAW-DW:Sawtooth wave (negative polarity) SQR:Square wave RND:Random wave TRP:Trapezoidal wave S&H:Sample & hold wave. This randomly changes the output value once per cycle. CHS:Chaos wave VSINE:Deformed sine wave. This randomly changes the amplitude of the sine wave once per cycle. | |
[RATE] knob | Sets the speed of the LFO cycle. The LFO cycle (rate) is set as a note length when the Rate Sync in the LFO setting is “ON”. | ||
[FADE] knob | Sets how long it takes for the LFO to reach maximum amplitude. | ||
[PITCH] knob | Sets how much the LFO affects the pitch. | ||
[FILTER] knob | Sets how much the LFO affects the cutoff frequency. | ||
[AMP] knob | Sets how much the LFO affects the volume. | ||
 Effects section
The SH-4d features one multi-effect unit (Tone MFX) per part, as well as four pattern effect units (Multi-effect (MFX), Delay, Chorus and Reverb) that are applied to the mix of all parts.
Before using the [CTRL 1] and [CTRL 2] knobs to operate the effects, press the [TONE]–[DELAY] buttons in the effect section to select the effect you want to operate.
- For details on the effects, refer to “MFX parameters”.
Controller | Explanation |
|---|---|
[TYPE] knob | Switches between the type of effect you select. Press the knob to turn the selected effect on/off. If the tone effect or a pattern MFX is selected, turn the knob while pressing it to switch between effect categories. |
[CTRL 1] [CTRL 2] knobs | Sets the parameters for the effect you selected. If you've selected Pattern Reverb/Chorus/Delay, use the [CTRL 1] knob to set the send amount to each effect.
|
[TONE] button | Quick press:Selects the tone effect. Long press:Shows the tone effect settings screen. Ø “MFX parameters” |
[MFX] button | Quick press:Selects the pattern MFX. Long press:Shows the pattern MFX settings screen. Ø “MFX parameters” |
MFX [ON] button | Switches the pattern MFX on/off, regardless of which effect is selected. |
[REVERB] button | Quick press:Selects the pattern reverb. Long press:Shows the pattern reverb settings screen. Ø “PATTERN REVERB” |
[CHORUS] button | Quick press:Selects the pattern chorus. Long press:Shows the pattern chorus settings screen. Ø “PATTERN CHORUS” |
[DELAY] button | Quick press:Selects the pattern delay. Long press:Shows the pattern delay settings screen. Ø “PATTERN DELAY” |
MEMO
Hold down the [SHIFT] button and press each button in the effect section to display the setting screen for each effect.
 Step sequencer section
Controller | Explanation |
|---|---|
[START] button | Plays/stops the sequencer. |
[PATTERN] button | Turn this on (the button lights up) to switch to the PATTERN screen. The unit enters pattern mode. |
[1]–[16] buttons | Use these to input notes into the step sequencer. When in pattern mode, this selects the pattern. |
[PAGE/TIE] button | Switches between the sequencer steps (pages) that are operated with the [1]–[16] buttons. When you’re editing with the sequencer, this inputs a tie. In pattern mode, press the [1]–[8] buttons while holding down the [PAGE/TIE] button to switch between pattern banks. |
Functions when holding down the [SHIFT] button and pressing the [START] [PATTERN], [1]–[16] and [WRITE] buttons
Controller | Explanation |
|---|---|
[START] (REC) | Switches the step sequencer to Realtime Rec mode. Ø “Recording your performance in real time (Real-time input)” |
[PATTERN] (EDIT) | Shows the PATTERN SETTINGS screen. |
[1] (PART1) | Selects part 1. |
[2] (PART2) | Selects part 2. |
[3] (PART3) | Selects part 3. |
[4] (PART4) | Selects part 4. |
[5] (RHYTHM) | Selects part R. |
[6] (TONE) | Shows either the TONE screen or the RHYTHM KIT screen. |
[7] (MATRIX) | Shows the MATRIX screen. |
[8] (LFO) | Shows the LFO screen. |
[9] (EQ) | Shows the TONE EQ screen. |
[10] (INIT) | When the current part is a tone part:Initializes the tone. When the current part is a rhythm part:Initializes the rhythm kit or rhythm instrument. |
[11] (TEMPO) | Shows the PATTERN TEMPO screen. |
[12] (UNDO) | Reverses the most recent sequencer operation, such as the note you inputted or deleted (UNDO). Hold down the [SHIFT] button and the [EXIT] button and then press the [12] button to cancel your most recent reversed action (REDO). |
[13] (COPY) | Shows the COPY screen. |
[14] (UTILITY) | Shows the PATTERN UTILITY screen. |
[15] (CLEAR) | When the current part is a tone part:Erases all notes in the step sequencer. When the current part is a rhythm part:Erases all notes for all instruments or for the current instrument in the step sequencer. On the PATTERN screen, this erases all notes in all parts. |
[16] (MENU) | Shows the MENU screen. Ø “Main menu (MENU)” |
[PAGE/TIE] (WRITE) | Shows the WRITE MENU screen. |
 Keyboard section
Controller | Explanation |
|---|---|
OCTAVE [-] [+] buttons | Switches between octaves for the keyboard section. Press both buttons at the same time to reset the octave setting. |
PITCH [-] [+] buttons | Applies pitch bend to the currently selected part while you hold down the buttons. |
Keyboard buttons | Use these buttons as a keyboard. These can be used in combination with the [1]–[16] buttons to input notes into the sequencer. For part R, this selects the instrument to edit.
|
[ARPEGGIO] button | Turns the arpeggio on/off. Use this with the [SHIFT] button to show the settings screen. |
[HOLD] button | Turns the arpeggio hold on/off.
|
 [VOLUME] knob
Adjusts the volume.
 [D-MOTION] button
Turns the D-Motion function on/off, which controls the tones according to the angle at which this unit is tilted.
For details, refer to “Using D-MOTION”.
- When using this function, firmly grip both sides of this unit and be careful that the connected cables are not excessively bent.