This section explains the names of the components of the GO:PODCAST and how each one works.
Name |
Explanation |
||
|---|---|---|---|
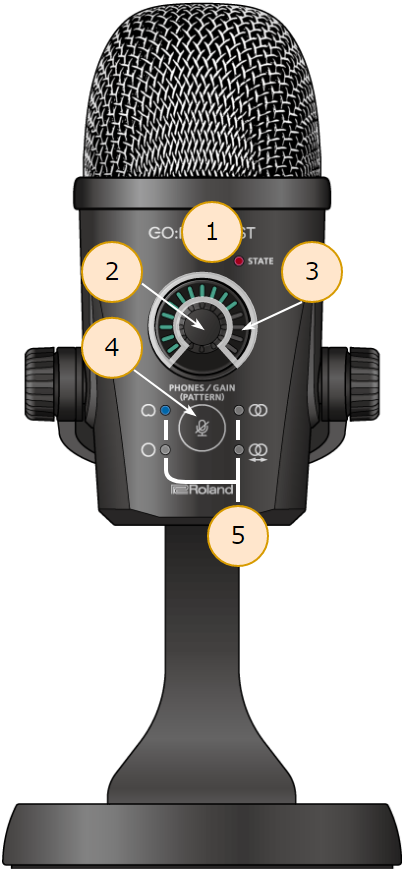
| 1 | STATE indicator |
Shows the app status when the GO:PODCAST is connected to the GO:PODCAST app. |
|
Unlit |
The GO:PODCAST app is not connected. |
||
Lit blue |
The GO:PODCAST app is connected. |
||
Lit red |
Now recording or streaming. |
||
Blinking red (in one-second intervals) |
Now getting ready to record or stream. |
||
Blinking red (in 0.2-second intervals) |
An error occurred during recording or streaming. For details on the error, refer to “Roland Support” site. |
||
| 2 | Knob (turn) |
Lets you adjust the headphone volume or mic gain. |
|
Knob (press) |
Switches between the functions that are controlled (adjusting the headphone volume or setting the mic gain) when you turn the knob. |
||
| Knob (long-press) | Changes the mic’s directivity. | ||
3 |
Main indicators |
Indicates the headphone volume and mic gain, as well as the mic mute status. |
|
Blue |
Indicates the mic audio output from the PHONES jack and the volume of audio from the smartphone or computer. |
||
Yellow |
Indicates the mic gain setting. |
||
Red |
Lights up when the mic is muted. |
||
| 4 | Mute button |
Mutes the mic audio. When muted, the audio from the mic is not sent from the smartphone or computer. The mute button uses a touch sensor. You can mute/unmute the audio by touching the mute button for at least one second with your finger. When mute is on, the main indicator lights up red. Since the mute button features a touch sensor, the button doesn’t make any switching noises that can be picked up by the mic, unlike a physical switch. |
|
5 |
Directivity indicators |
These indicators show the mic directivity (the directions from which the mic receives signals). |
|
|
|
Single direction. Audio is received only from directly in front of the mic. |
||
|
|
All directions. The mic receives audio from all directions, including the rear. |
||
|
|
The mic receives audio in stereo. Audio received by the left-right mic channels is recorded in stereo, and is output to your smartphone or computer. |
||
|
|
The mic receives audio in stereo with the left-right channels inverted. While the left-right audio signals from the mic are recorded in stereo, the channels are switched when output to your smartphone or computer. Select this if the stereo images for the camera video and audio do not match. |
||
Name |
Explanation |
|||
|---|---|---|---|---|
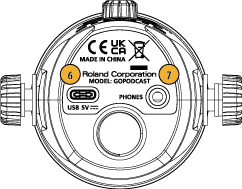
| 6 | USB 5V port (USB Type-C®) |
Use the included USB Type-C to USB A or a USB Type-C to Type-C cable to connect to a smartphone or computer.
|
||
| 7 | PHONES jack | Connect a pair of stereo miniature phone type (3.5 mm) headphones here.
|