Using the functions
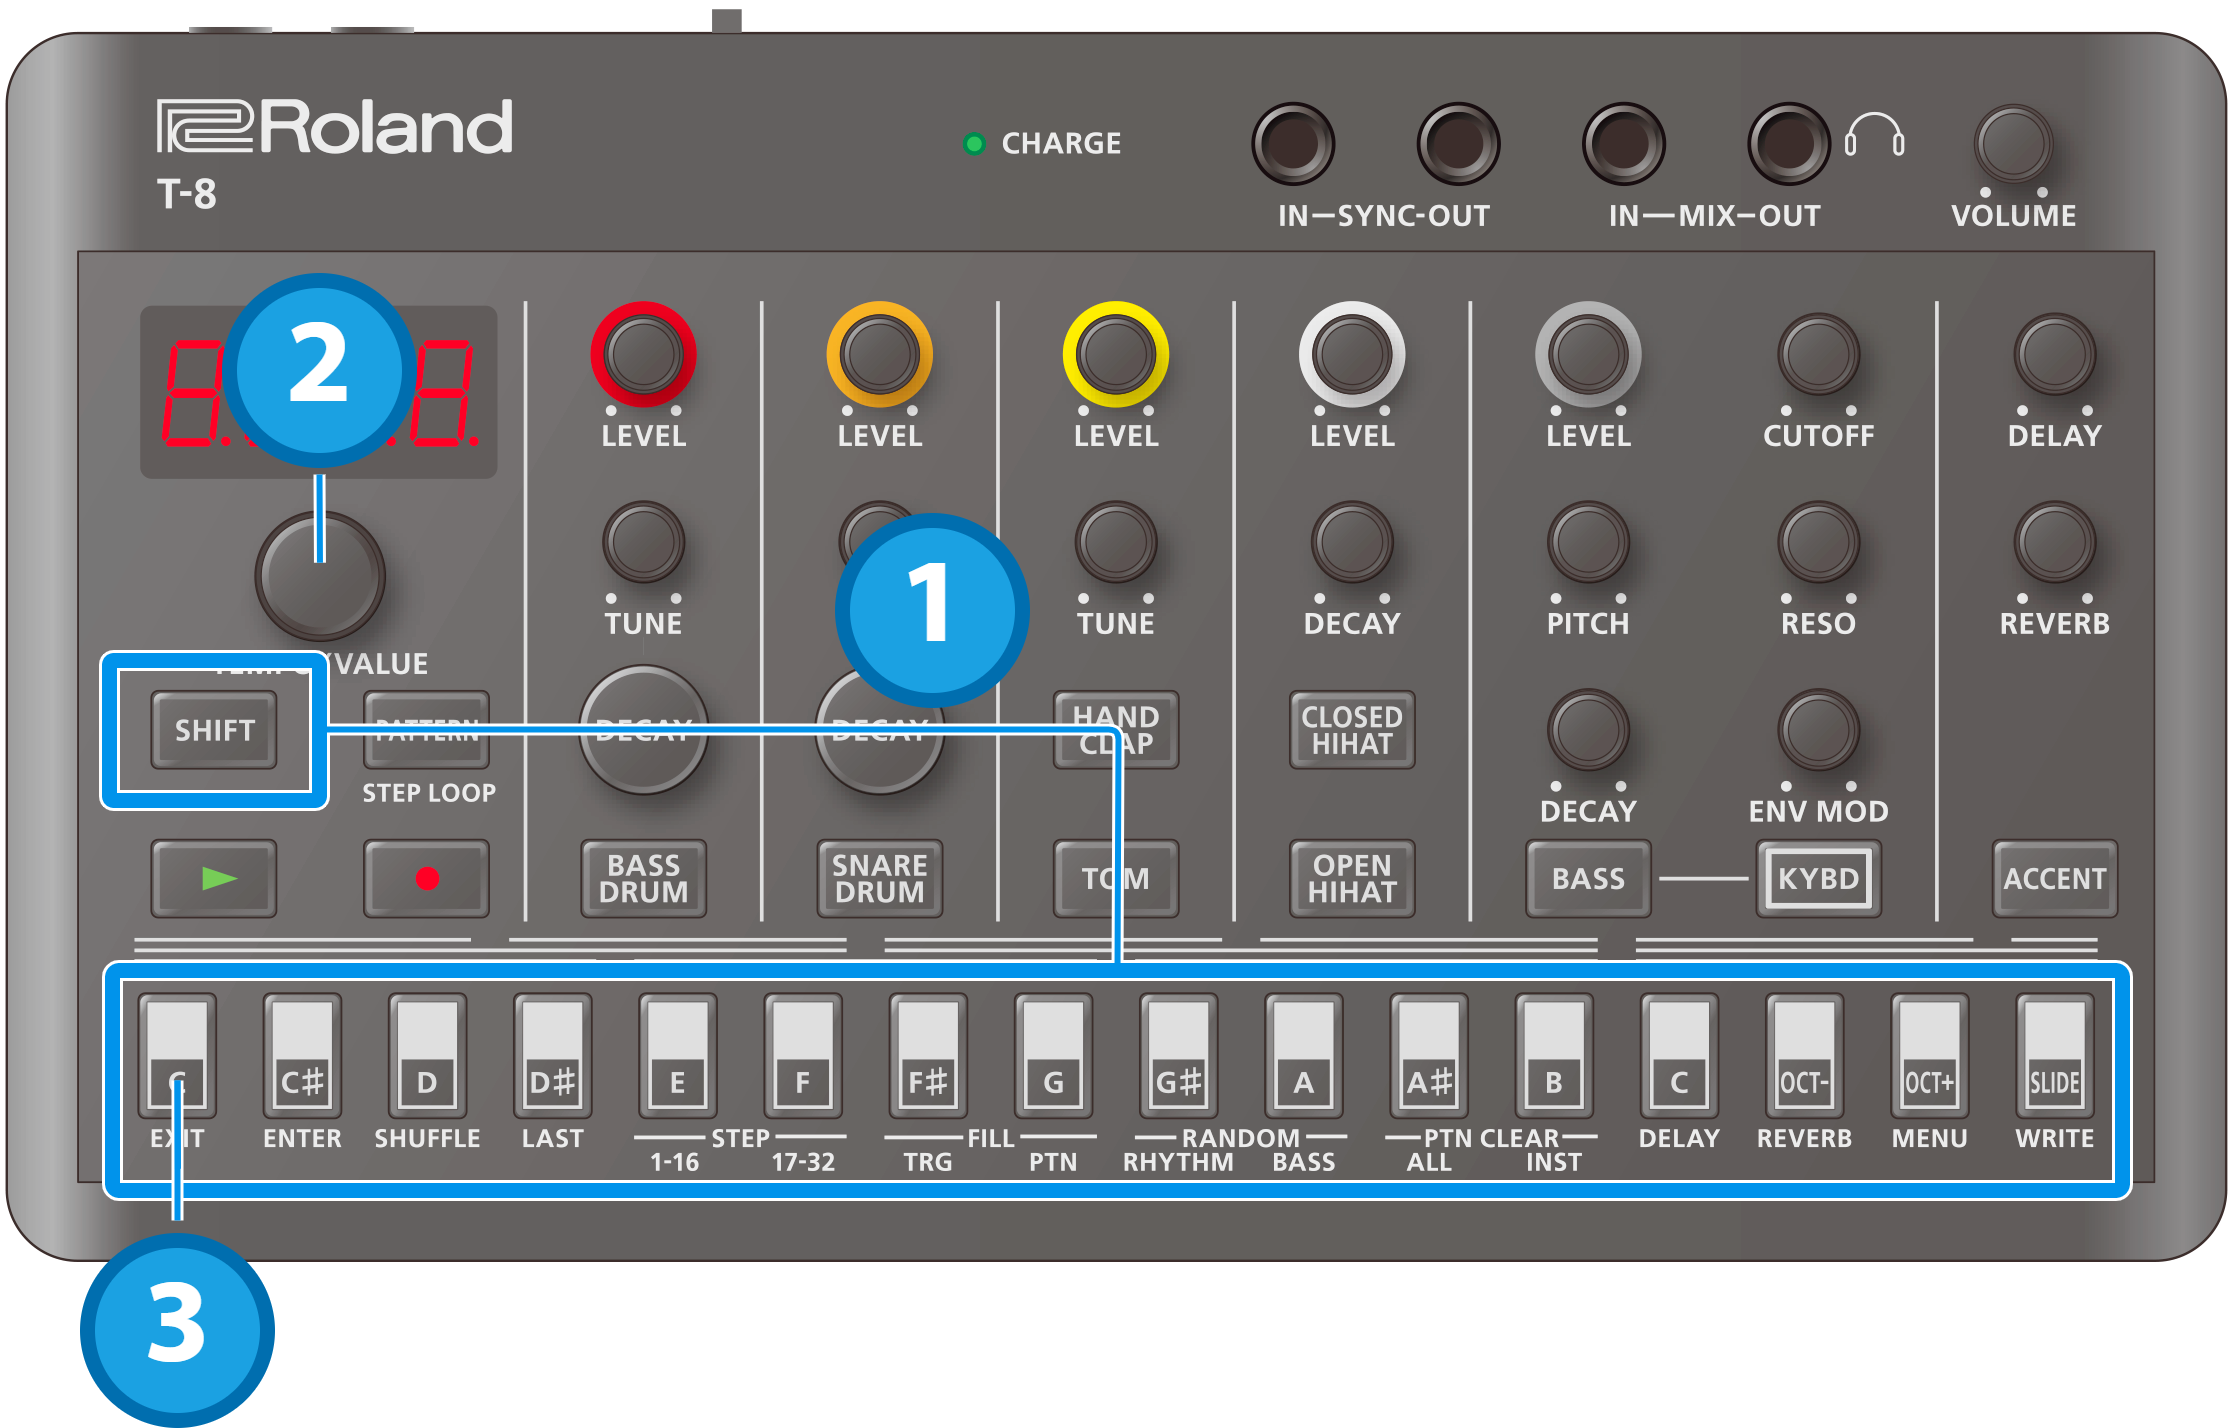
Hold down the [SHIFT] button and press the step button corresponding to the function you want to execute.
When switching between STEP 1–16/17–32 or using FILL TRG, RANDOM or PTN CLEAR, the display returns to the previous screen after the function is executed.
For the other functions, you can proceed to step 2 to set the value.Use the [TEMPO/VALUE] knob or step buttons (for FILL PTN) to set the value.
When you are finished, press the [C (EXIT)] button.
List of functions
Operation |
Explanation |
|---|---|
| [SHIFT] + [C (EXIT)] | Exits the menu. |
| [SHIFT] + [C# (ENTER)] | Confirms the editing of a value or the selection of an item. |
| [SHIFT] + [D (SHUFFLE)] | Configures the pattern shuffle settings. |
| [SHIFT] + [D# (LAST)] | Sets the length (the last step) of the selected pattern.
|
| [SHIFT] + [E (STEP 1-16)] | Switches the steps to edit with the sequencer to the first half (page 1). |
| [SHIFT] + [F (STEP 17-32)] | Switches the steps to edit with the sequencer to the second half (page 2). |
| [SHIFT] + [F# (FILL TRG)] | Inserts a fill-in at the end of the pattern. |
| [SHIFT] + [G (FILL PTN)] | Sets the pattern number where a fill-in is inserted, by using the step buttons (1–16).
|
[SHIFT] + [G# (RANDOM RHYTHM)] |
Generates a random rhythm pattern. |
[SHIFT] + [A (RANDOM BASS)] |
Generates a random bass pattern. |
[SHIFT] + [A# (PTN CLEAR ALL)] |
Deletes the selected pattern. |
[SHIFT] + [B (PTN CLEAR INST)] |
Deletes the selected instrument’s pattern. |
| [SHIFT] + [C (DELAY)] | Configures the delay. |
| [SHIFT] + [OCT- (REVERB)] | Configures the reverb. |
| [SHIFT] + [OCT+ (MENU)] | Displays the menu. |
| [SHIFT] + [SLIDE (WRITE)] | Saves the pattern. |
Using the menu
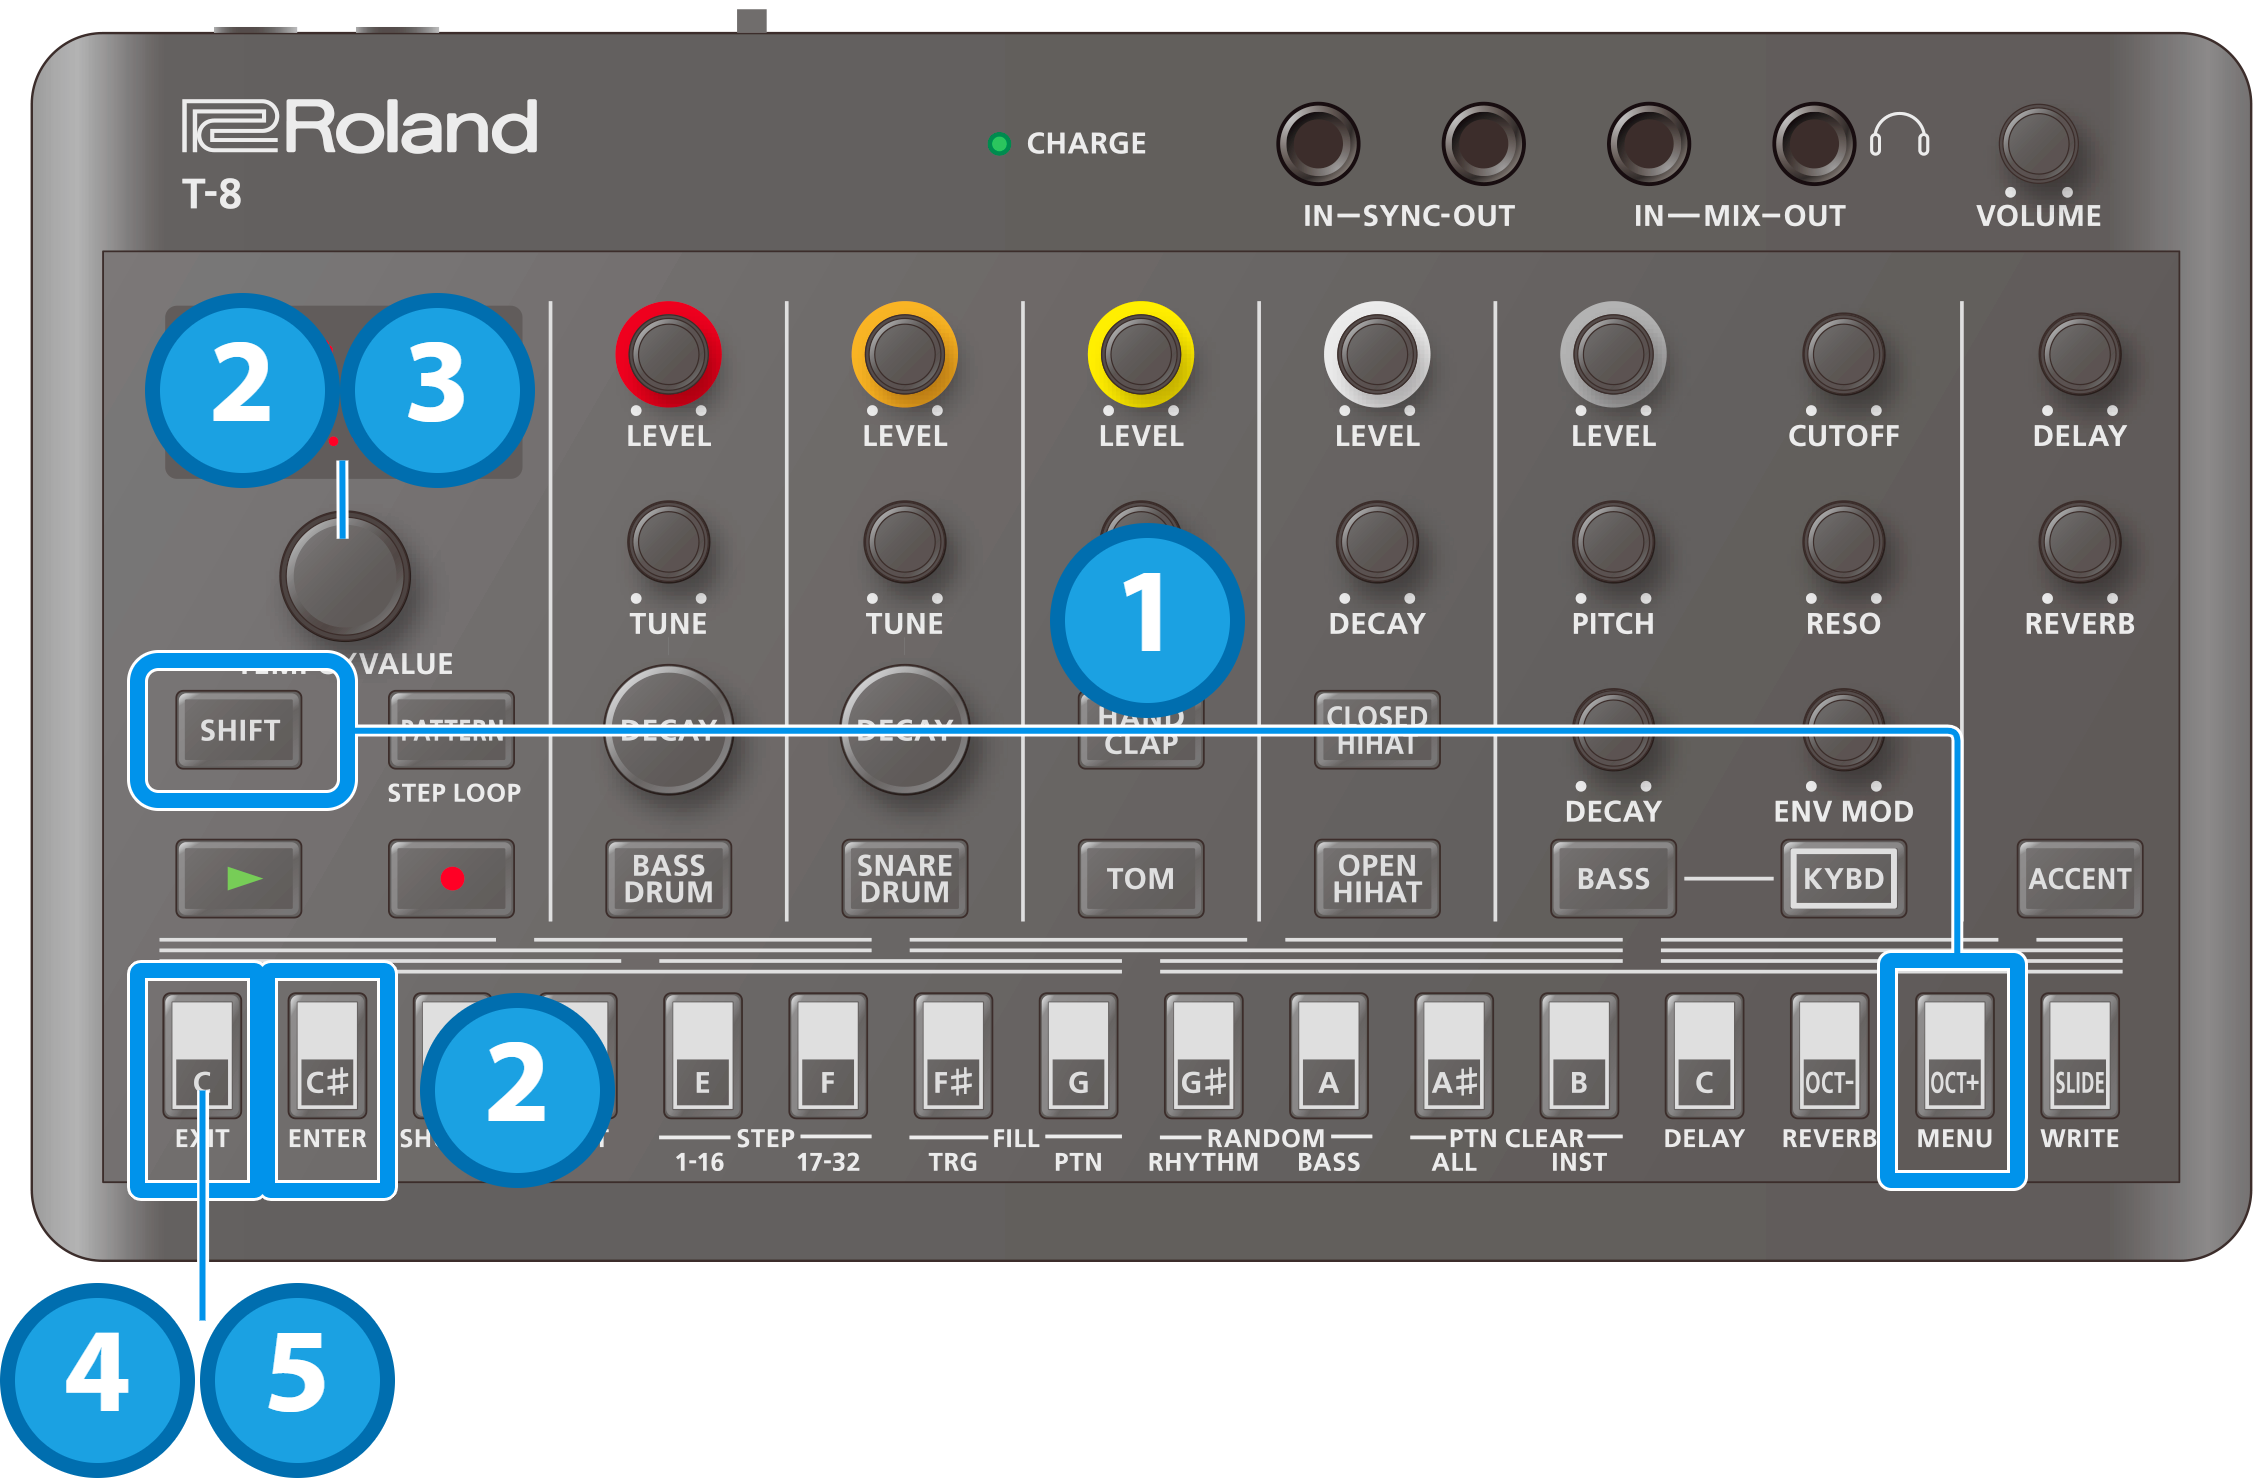
Hold down the [SHIFT] button and press the [OCT+ (MENU)] button.
Use the [TEMPO/VALUE] knob to select the item, and press the instrument button or the [C# (ENTER)] button.
The value is displayed.
Ø Menu listTurn the [TEMPO/VALUE] knob to set the value.
Press the [C (EXIT)] button to return to the list of menus (step 2).
When you are finished making the settings, press the [C (EXIT)] button again.
Menu list
This is a list of menus that you can execute using the [SHIFT] + [OCT+ (MENU)] button combination.
Use the [TEMPO/VALUE] knob to select the item, and then press the [C# (ENTER)] button to display the values for each item.
Item |
Value |
Explanation |
|---|---|---|
NUtE (Mute) |
Instrument button blinks or is lit | Temporarily mutes the selected instrument.
|
| GAIn (Gain) | 0–200 | Adjusts the gain of the instrument you selected. |
| tUnE (Tune) | -128–127 | Adjusts the tuning (pitch) of the selected instrument. |
| dECY (Decay) | -128–127 | Adjusts the decay length of the instrument you selected. |
| PAn (Pan) | L64–C0–r63 | Adjusts the panning (where the instrument is in the stereo field) of the selected instrument (L64–C0–R63). |
| AtK (Attack) | 0–255 | Adjusts the attack strength of the bass drum. |
| SnPy (Snappy) | 0–255 | Adjusts the volume of the snare wires for the snare drum sound. |
| CoIr (Color) | -128–127 | Adjusts the noise volume of the low tom, the noise tom and the high tom. |
| tON (Tom) | tON1, tON2 | Sets the sound used for the tom part. |
| CLAP (Hand Clap) | CP, hnt, htON | Sets the sound for the hand clap part. |
| ƶtNp (Open HiHat Tempo Sync) | OFF, On | When this is on, the decay of the open hi-hat lengthens along the tempo. |
| ƼľAv (Bass Wave) | SAľ, Sqr | Selects the bass waveform. |
| ƐACC (Rhythm Accent) | OFF, 1–255 | Adjusts the strength of the rhythm accent. |
| ƼACC (Bass Accent) | OFF, 1–255 | Adjusts the strength of the bass accent. |
ƳSyn |
OFF, OnCE, ALľy | Sets the synchronization timing of the rhythm and bass sequencer patterns. |
| ƐSCL (Rhythm Step Scale) | 16, 32, 8-3, 16-3 | Sets the rhythm sequencer’s step scale. |
| ƼTRi (Bass Step Triplet) | OFF, On | Sets the bass sequencer’s step scale. |
| OƞOn (Overdrive On) | OFF, On | Turns overdrive on/off for the selected instrument. |
| Oƞdr (Overdrive Drive) | 0–127 | The overdrive gain (common to all instruments). |
| OƞLv (Overdrive Level) | 0–127 | The overdrive level. |
| ƞSyn (Delay Sync) | OFF, On | Synchronizes the delay time to the tempo. |
| ƞƐSE (Delay to Reverb Send) | 0–127 | Adjusts the amount of delay to send to the reverb. |
| SC (Side Chain) | OFF, 1–100 | Sets the depth of the side chain effect that uses a rhythm instrument as a trigger, as well as the effect’s sustain time. A value within 1–50 changes the depth, and a value above 50 changes the sustain time at a specific depth.
|
| SŹdG (Side Chain Ducking/Gate) | dv.50–dv. 1 |
Configures the depth of the ducking or gate effect when side chained to an instrument, delay/reverb or USB input. |
| SŹti (Side Chain Time Ratio) | 0.5–1.0–2.0 | When the value is set to 1.0, the effect is applied in lengths of eighth notes respective to the tempo. |
| SŹSr (Side Chain Trigger Source) | bd, Sd, CLAP, tON, CH, OH | Selects the source instrument that triggers the side chain. |
| ƭcLk (Sync Clock) | 1, 2, 3, 4, 6, 8, 12, 24 | Sets the number of sync clocks per beat. |
| rƴCh (Rhythm MIDI Channel) | 1–16, OFF | Sets the MIDI transmitting/receiving channel for the rhythm. |
| bƟCh (Bass MIDI Channel) | 1–16, OFF | Sets the MIDI transmitting/receiving channel for the bass. |
| tXPc (TX Program Change) | OFF, On | Sets whether program change messages are transmitted or not when the pattern changes. |
| rXPc (RX Program Change) | OFF, On | Sets whether the pattern changes when a program change message is received. |
| Pc.Ch (Program Change Channel) | 1–16 | Sets the MIDI channel for transmitting/receiving the program change messages used to change patterns. |
| SYnC (MIDI Clock Sync) | AUTO, Int, NIdI, USB | Sets which synchronization signal is used by this unit.
|
| thrv | OFF, On | Sets whether to output the messages that are input from the MIDI IN jack (ON, the default value) or not (OFF). |
USƼd |
OFF, 1–127 | Sets whether the [VOLUME] knob affects the output volume of signal going to USB. |
ƷLnk (*1) |
OFF, On | Set this to ON when connecting a device via USB that is compatible with AIRA LINK, such as the MX-1. Otherwise, leave this at the OFF setting. |
| LvŸC | nrN, SPL | Sets the curve for the [LEVEL] knob. |
| rLod | The selected pattern is restored to its last saved state. | |
| rLƞr | The rhythm of the selected pattern is restored to its last saved state. | |
| rLƞb | The bass of the selected pattern is restored to its last saved state. | |
| COPY |
Copies the current pattern to a specified pattern.
|
|
| CPƮr |
Copies the rhythm pattern to a specified pattern.
|
|
| CPƮb |
Copies the current bass pattern to a specified pattern.
|
|
*1: When using with another port besides the USB HOST 3 port on the MX-1, use “battery-only mode”. To use battery-only mode, turn on the power while holding down the [C (EXIT)] button.
Shortcuts
Item |
Operation |
|---|---|
Switch between pattern banks |
Select bank 1 |
Select bank 2 |
|
Select bank 3 |
|
Select bank 4 |
|
| Overdrive settings (Od.On) | [PATTERN] button + STEP10 [A (RANDOM BASS)] button |
Bass waveform settings (b.ľAv) |
[PATTERN] button + STEP11 [A# (PTN CLEAR ALL)] button |
| Side chain settings (SC) | [PATTERN] button + STEP12 [B (PTN CLEAR INST)] button |
| Reload a rhythm pattern | [PATTERN] button + STEP14 [OCT- (REVERB)] button |
| Reload a bass pattern | [PATTERN] button + STEP15 [OCT+ (MENU)] button |
Reload a pattern |
[PATTERN] button + STEP16 [SLIDE (WRITE)] button |
| Master probability settings | [PATTERN] button + [TEMPO/VALUE] knob |
| Rhythm instrument probability settings | Each step button + [TEMPO/VALUE] knob |
| Input a sub step | Each rhythm instrument button + step 1–16 buttons |
Shift a pattern for each instrument forward/backward |
Each instrument button + [TEMPO/VALUE] knob |
Transpose the bass |
[BASS] button + [KYBD] button + [TEMPO/VALUE] knob |
Set the rhythm accent |
While a rhythm instrument is selected: |
Set the bass accent |
While the bass is selected: |