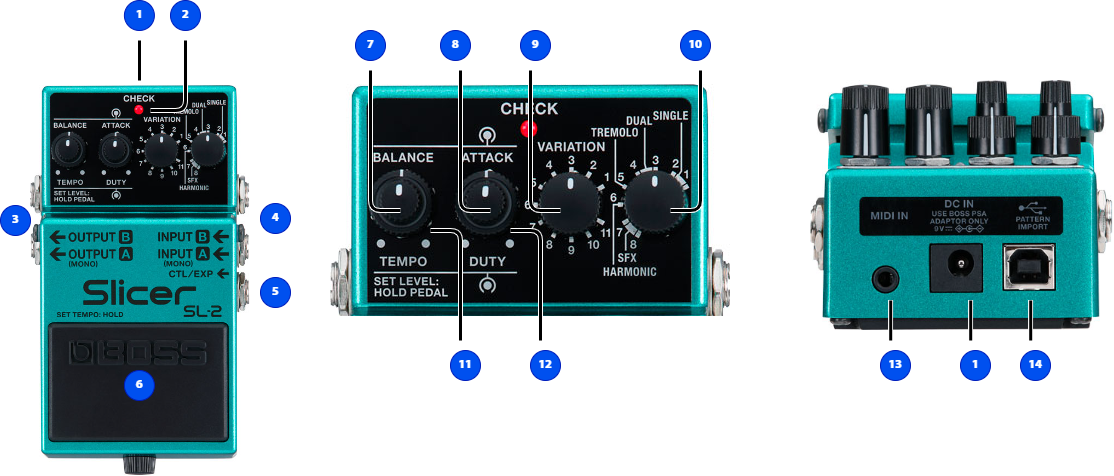
Name |
Function |
||
|---|---|---|---|
|
1 |
DC IN jack |
Accepts connection of an AC Adaptor (PSA series; sold separately).
|
|
2 |
CHECK indicator |
This indicator shows whether the effect is ON/OFF, and doubles as the tempo and battery check indicator. The indicator lights up red when the effect is on and lights up green when the effect is off. The indicator also blinks in time with the tempo.
|
|
3 |
OUTPUT A (MONO), OUTPUT B jacks |
Connect these jacks to your amp or monitor speakers. Use only the OUTPUT A (MONO) jack if using this unit in mono. If you’re using a stereo setup, use the OUTPUT A (MONO) and OUTPUT B jacks. When you connect to both the OUTPUT A (MONO) and OUTPUT B jacks, an effect is produced according to the OUTPUT MODE settings. For details, refer to “Selecting Various Ways of Outputting the Effect Sound (OUTPUT MODE)”. |
|
4 |
INPUT A (MONO), INPUT B jacks |
Connect your guitar, bass, or effect unit here. Use only the INPUT A (MONO) jack if using this unit in mono. Use the INPUT A (MONO) jack and INPUT B jack when connecting to an effect unit with stereo outputs.
|
|
5 |
CTL/EXP jack |
|
|
|
6 |
Pedal switch |
|
|
|
7
|
[BALANCE] knob | Adjusts the balance between the effect sound and the direct sound. Turn the knob all the way clockwise to hear only the effect sound, and turn the knob all the way counterclockwise to hear only the direct sound. |
|
| 8 | [ATTACK] knob | Adjusts the volume of the attack waveform for the slice pattern. | |
|
9
|
[VARIATION] knob | Selects the pattern variations. | |
| 10 | Type knob | Switches between different slicer types. |
|
SINGLE (1, 2) |
A type that uses a single slicer effect. |
||
DUAL (3, 4) |
A type that uses two slicer effects. |
||
TREMOLO (5) |
A tremolo pattern. |
||
HARMONIC (6) |
A modulated slice pattern. |
||
SFX (7, 8) |
Slice patterns to which various effects are applied. |
||
|
11
|
[TEMPO] knob |
Sets the tempo (BPM 40–300).
|
|
| 12 | [DUTY] knob |
Adjusts the ratio (sound length) with which the slice pattern sounds. Turn the knob counterclockwise to make the sound shorter ( |
|
|
13
|
MIDI IN connector | This connector receives timing clocks, start/continue/stop messages and control change messages from an external device.
|
|
| 14 | PATTERN IMPORT port |
Connect your computer to the SL-2 with a USB cable. You can swap slice patterns by using the dedicated app, “BOSS TONE STUDIO for SL-2”. For details, refer to “Using BOSS TONE STUDIO for SL-2”. |
|
- Do not use connection cables that contain a built-in resistor.
- To prevent malfunction and equipment failure, always turn down the volume, and turn off all the units before making any connections.
Turning the power on/off
Once everything is properly connected, be sure to follow the procedure below to turn on their power. If you turn on equipment in the wrong order, you risk causing malfunction or equipment failure.
Turning the Power On
Turn on the power to your amp last.
Turning the Power Off
Turn off the power to your amp first.
- Before turning the unit on/off, always be sure to turn the volume down. Even with the volume turned down, you might hear some sound when switching the unit on/off. However, this is normal and does not indicate a malfunction.
 ). Turn the knob clockwise to make the sound longer (
 ).
).