- Select [MENU] Ó “SYSTEM”.
Use the cursor [à] [á] [ã] [â] buttons to select “AUDIO SETUP” and press the [ENTER] button.
The AUDIO SETUP screen appears.
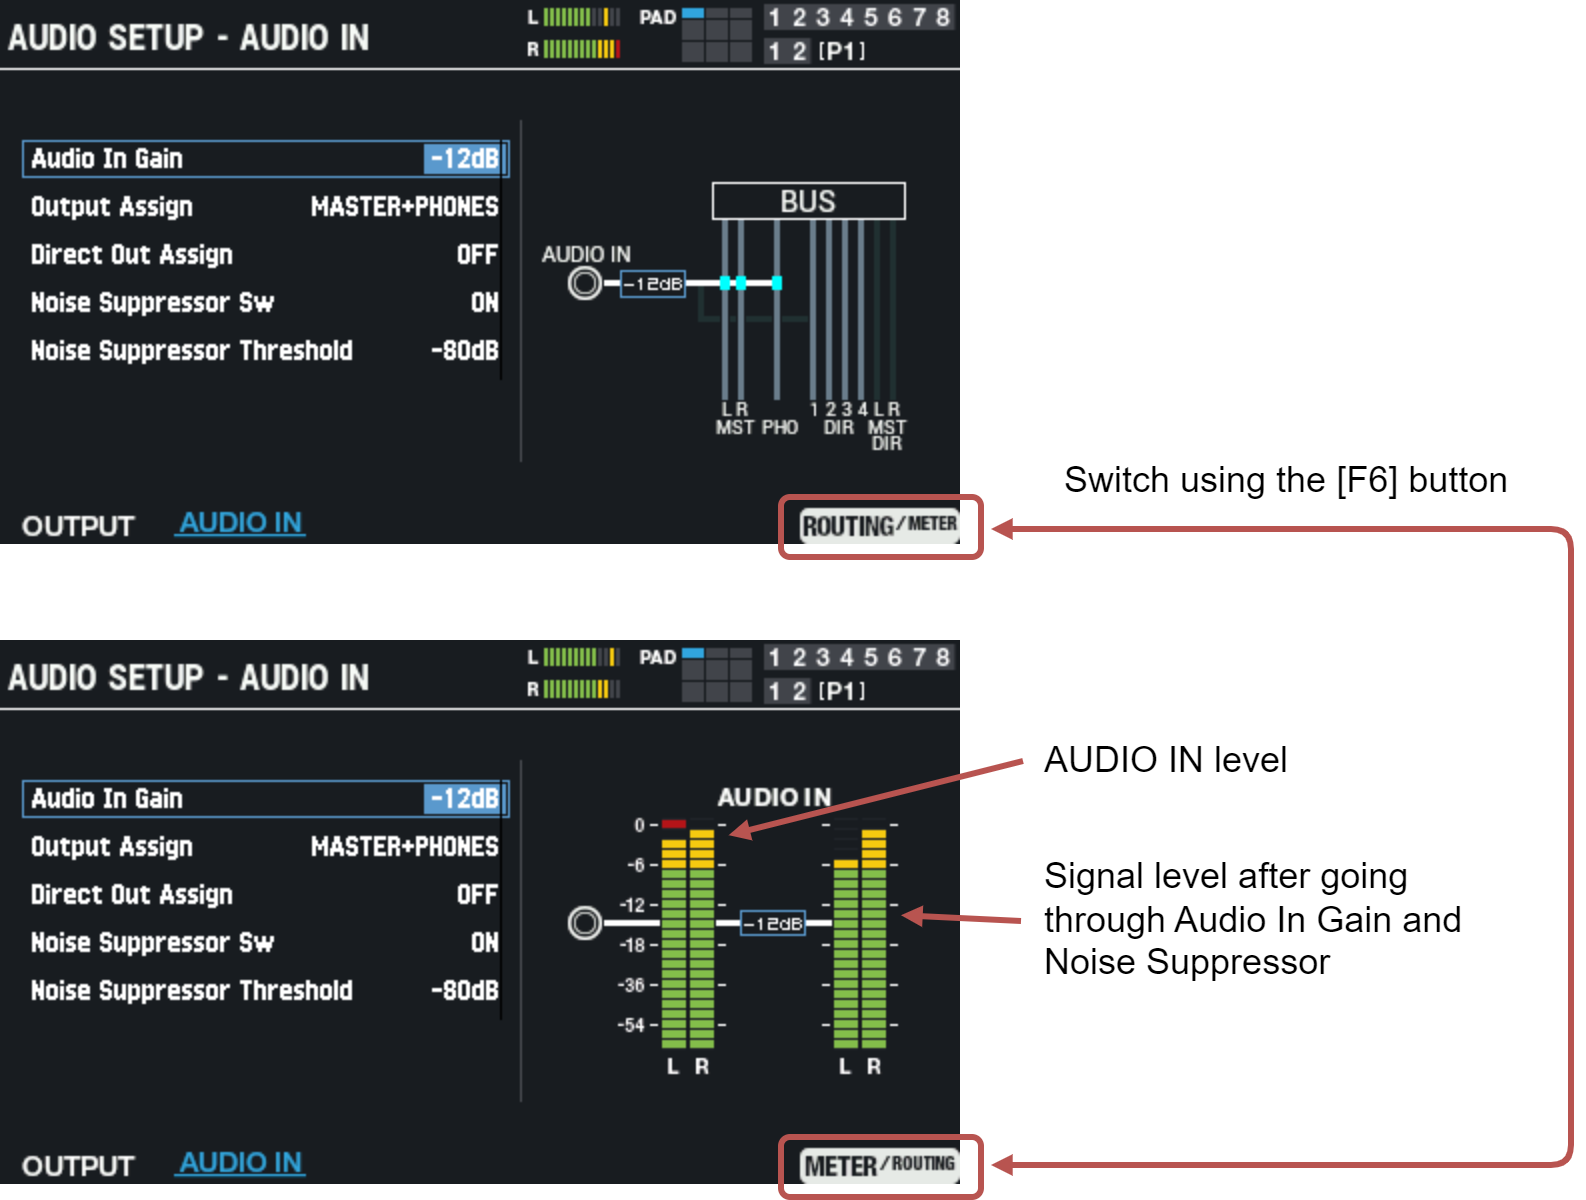
Use the [F1]–[F2] buttons to switch between settings screens.
Button
Explanation
[F1] (OUTPUT)
Configures the OUTPUT settings.
[F2] (AUDIO IN)
Configures the AUDIO IN settings.
Use the cursor [à] [á] buttons to select a parameter, and then use the [-] [+] buttons to change the setting.
OUTPUT
Configures the OUTPUT settings.
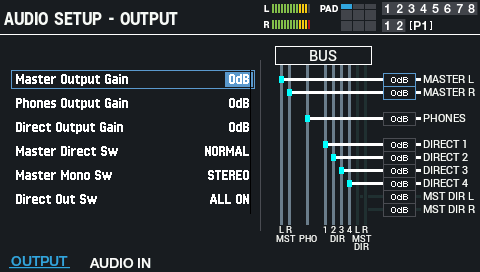
Parameter
Value
Explanation
Master Output Gain -24–+12 dB Adjusts the volume (gain) from the MASTER OUT jacks.
If the output sound from this unit is too loud and is distorted on the received end, use this parameter to lower the volume.- Note that the sound may distort if you raise the volume too high.
Phones Output Gain -24–+12 dB Adjusts the volume (gain) from the PHONES jack.
Adjust the audio output from the PHONES jack to the appropriate volume.- Note that the sound may distort if you raise the volume too high.
Direct Output Gain -24–+12 dB Adjusts the volume (gain) of the DIRECT OUT jacks.
If the output sound from this unit is too loud and is distorted on the received end, use this parameter to lower the volume.
This applies to all DIRECT OUT jacks. If the Master Direct Sw is set to “DIRECT”, effects are also applied to the output from the MASTER OUT jacks.- Note that the sound may distort if you raise the volume too high.
Master Direct Sw NORMAL, DIRECT Selects whether the output of the MASTER OUT jacks is the same signal as the DIRECT OUT jacks (DIRECT) or not (NORMAL).
If this is set to “DIRECT”, the output of the MASTER OUT jacks is not affected by the master effect, master comp and master EQ, which lets you use the MASTER OUT jacks as DIRECT OUT jacks (the setting of the [MASTER] knob applies).
This setting also applies to the USB audio output to your computer.Master Mono Sw STEREO, MONO x2 Selects whether the output from the MASTER OUT jacks is in stereo (STEREO) or in mono (MONO×2). With the MONO×2 setting, the same monophonic signal is output from both the L and R jack.
This is useful when you’re connecting to an amp with a mono input.Direct Out Sw ALL OFF, ALL ON Configures the output to the DIRECT OUT jacks. When this is set to “ALL OFF”, all output from the DIRECT OUT jacks is disabled.
If the Master Direct Sw is set to “DIRECT”, effects are also applied to the output from the MASTER OUT jacks. This is effective when you want to temporarily stop the sound coming from the DIRECT OUT jacks.AUDIO IN
Configures the AUDIO IN settings.
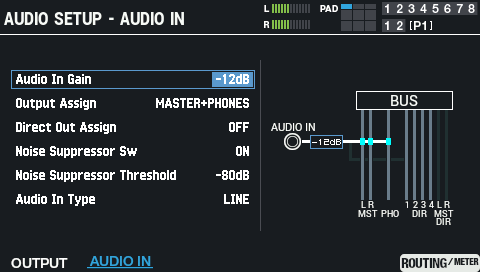
Parameter
Value
Explanation
Audio In Gain -36–+12 dB Adjusts the input level (gain) for the AUDIO IN jack.
- Note that the sound may distort if you raise the volume too high.
Output Assign MASTER+PHONES, PHONES-ONLY Adjusts the output destination of the input signal from the AUDIO IN jack.
MASTER+PHONES: Outputs to the headphones jack and MASTER OUT jacks (when “Master Direct Sw” is “NORMAL”).
PHONES ONLY: Outputs only to the headphones jack. No sound is output from the MASTER OUT jacks.Direct Out Assign OFF, DIRECT 1–4, DIRECT 1+2–3+4 (L+R), MASTER DIRECT L–R, MASTER DIRECT L+R This sets the output from the DIRECT OUT 1-4 jacks and MASTER OUT jacks (when “Master Direct Sw” is “DIRECT”). Noise Suppressor Sw OFF, ON Switches the noise suppressor on/off.
The noise suppressor is a feature that suppresses noise during periods of silence.Noise Suppressor Threshold -90–0 dB Adjusts the volume at which noise suppression starts to be applied. Audio In Type LINE、MIC Set this according to the device that’s connected to the AUDIO IN jack.
Use the “LINE” setting when connecting devices like digital audio players.
Select “MIC” when connecting a microphone or similar equipment.
Due to the characteristics of the audio circuit, some sounds may be more suitable for MIC input, and some other sounds cannot be recorded using MIC input.
Sounds that are suitable Sounds such as percussion that have high peak values.
You can set Audio In Type to “MIC” to sample sounds that are near the sound source.Sounds that cannot be recorded using MIC input
Vocals and similar sounds with low peak values.
For these sounds, input the audio source through the AUDIO IN by going through an audio device that has a mic input jack (such as a mixer), where you can adjust the gain.
In this case, set “Audio In Type” to “LINE”.Button
Explanation
[F6] (ROUTING/METER) button
[F6] (METER/ROUTING) buttonSwitches between the AUDIO IN jack routing display and the level meter display.