You can use the [REVERB] knob to add reverb (a reverberation effect) to the input audio. When doing this, you can apply reverb only to the audio from the mic (MIC 1, MIC 2, the built-in mic and the headset mic) without adding reverb to the audio from the LINE IN jack.
Follow the steps below to enable or disable reverb for the LINE IN jack audio. This is set to “enabled” when using the factory settings.
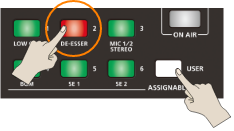
Press the ASSIGNABLE DECK [2] button while long-pressing the [USER] button to enable/disable the reverb effect for the LINE IN audio.
The ASSIGNABLE DECK [1]–[6] buttons blink when the reverb setting is available.

The ASSIGNABLE DECK [2] button colors indicate whether the reverb applied to the LINE IN audio is enabled or disabled.
Lit color LINE IN audio reverb Explanation Green Enabled Reverb is applied to all input audio sources (mic, LINE IN). Red Disabled Reverb is only applied to the mic (MIC 1, MIC 2, built-in mic and headset mic) audio. Take your finger off the [USER] button.
About the LINE audio reverb settings
When the VRC-01 and the AeroCaster LIVE app are connected
- You can edit the reverb settings from the AeroCaster LIVE app.
- The reverb settings are saved by the app. When you launch the AeroCaster LIVE app, the settings saved in the app are automatically loaded into the VRC-01.
When using the VRC-01 as an audio interface or as a standalone mixer
- The reverb settings are not saved in the VRC-01. The VRC-01 always starts up with reverb set to “Enabled”, so you must change the reverb setting as needed.
- When the loopback function is ON, the reverb settings are applied to the audio from the LINE IN jack and the DEVICE port.