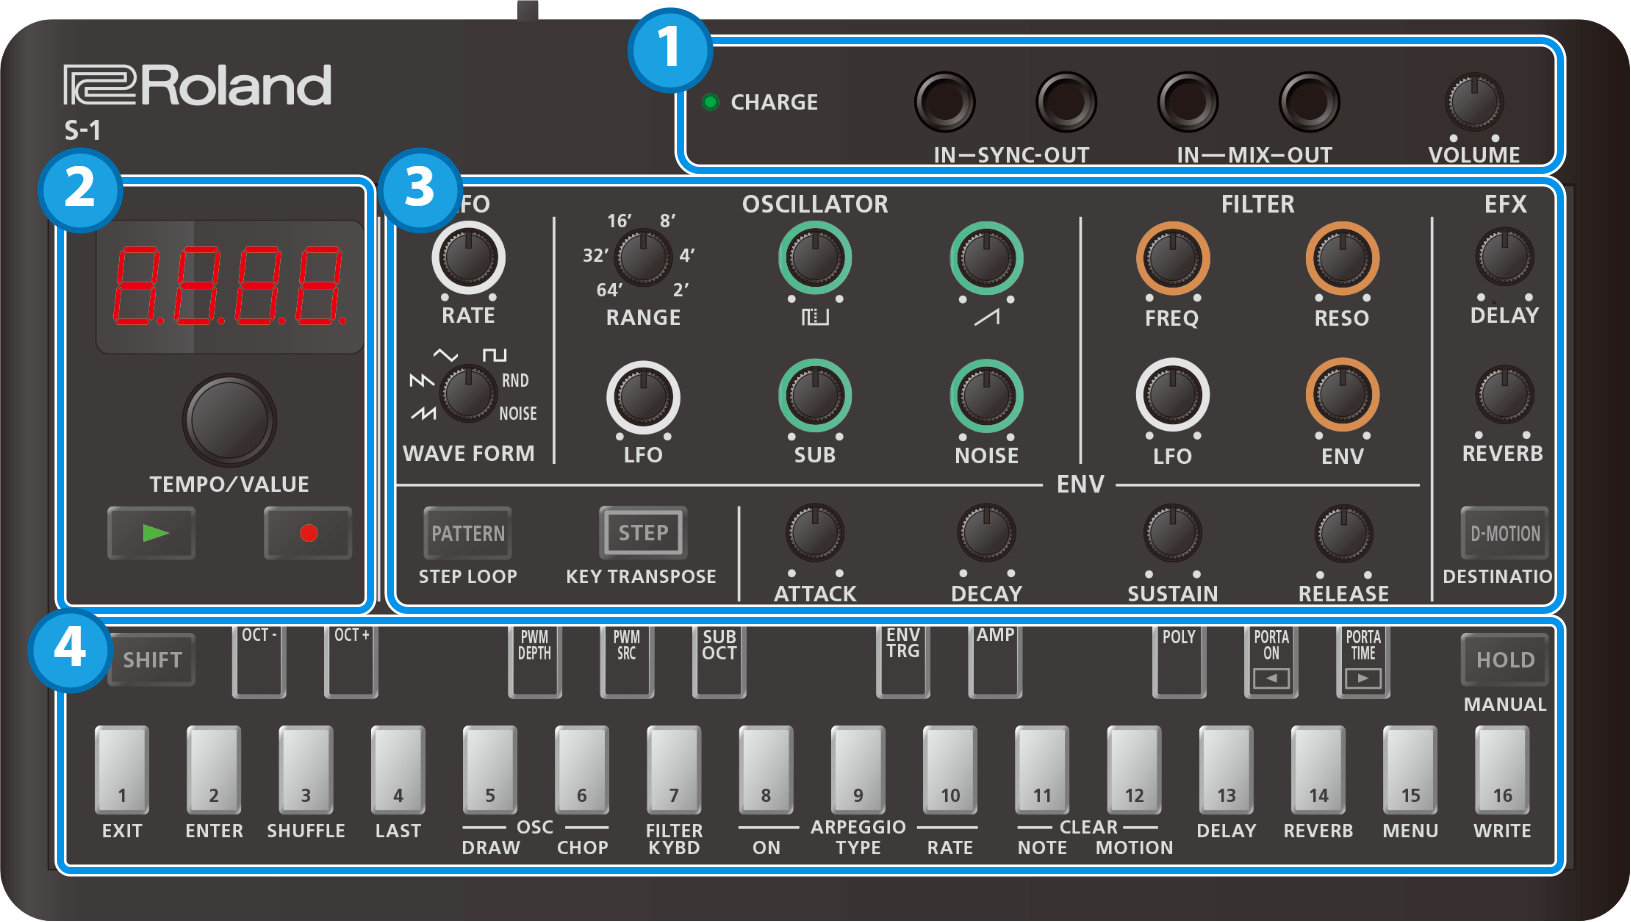
1. Connectors and jacks
Controller |
Explanation |
|---|---|
|
CHARGE indicator |
When charging via USB port: |
When not charging via USB port:
|
|
| SYNC IN jack | Use this jack to input synchronization signals from an external device. |
| SYNC OUT jack | Use this jack to output synchronization signals to an external device. |
| MIX IN jack |
This is the audio input jack. |
| MIX OUT jack |
This is the audio output jack. |
| [VOLUME] knob | Adjusts the volume of audio coming from the MIX OUT jack. |
To prevent malfunction and equipment failure, always turn down the volume, and turn off all the units before making any connections.
This product is equipped with a lithium-ion battery.
Even if you do not use this product for an extended period of time, you should charge it once every three months to prevent the internal lithium-ion battery from degrading.
Ambient temperature range during charging
5–35°C
However, in order to take full advantage of the lithium-ion battery’s performance, we recommend that you charge it in a temperature range of 10–30°C.- Use cables with monaural mini phone type plugs to connect to/from the SYNC IN/OUT jacks. Do not use cables with stereo mini phone type plugs, as these cables do not work.
- Do not connect an audio device to the SYNC OUT jack. Doing so may cause a malfunction.
- If an external device is connected to the SYNC IN jack, the unit synchronizes with the clocks inputted to the SYNC IN jack, regardless of the MIDI Clock Sync setting.
Use cables with stereo mini phone type plugs to connect to/from the MIX IN/OUT jacks. Do not use cables with monaural mini phone type plugs, as these cables do not work.
2.
Controller |
Explanation |
|---|---|
| Display | This is a four-digit, seven-segment LED display. If a pattern has been edited, a dot lights up on the right side of the display. |
| [TEMPO/VALUE] knob | Changes the values shown in the display. |
| [ø] (PLAY) button |
Plays the pattern. Press the button again to stop playback. |
[ó] (REC) button |
Switches the unit to recording standby. Recording starts when pattern playback begins. |
3.
Section |
Controller |
Explanation |
|---|---|---|
LFO |
[RATE] knob |
Determines the LFO’s modulation speed. |
| [WAVE FORM] knob |
Selects the LFO waveform.
|
|
OSCILLATOR |
[RANGE] knob | Sets the octave of the oscillator. |
| [LFO] knob | Adjusts the intensity at which LFO modulates the oscillator. |
|
|
[ |
Adjusts the level of the square wave. | |
|
[ |
Adjusts the level of the sawtooth wave. | |
| [SUB] knob | Adjusts the level of the sub oscillator. | |
| [NOISE] knob | Adjusts the level of the noise. | |
| FILTER | [FREQ] knob | Sets the cutoff frequency of the low-pass filter. |
| [RESO] knob | Emphasizes the frequencies around the filter’s cutoff frequency. | |
| [LFO] knob | When the cutoff frequency is set to be controlled by the LFO, this adjusts the intensity. |
|
| [ENV] knob | When the cutoff frequency is set to be controlled by the ENV, this adjusts the intensity. |
|
| ENV | [ATTACK] knob | Adjusts the attack time. |
| [DECAY] knob | Adjusts the decay time. | |
| [SUSTAIN] knob | Adjusts the sustain level. | |
| [RELEASE] knob | Adjusts the release time. | |
| EFX | [DELAY] knob | Adjusts the delay volume. |
| [REVERB] knob | Adjusts the volume of the reverb. | |
| [D-MOTION] (DESTINATION) button | Turns the D-MOTION function on/off, which controls the tones according to the angle at which this unit is tilted.
Use this with the [SHIFT] button to bring up the DESTINATION screen, where you can configure D-MOTION. |
|
| [PATTERN] (STEP LOOP) button | Turn this on (the button lights up) to switch to pattern select mode. Use this with the [SHIFT] button for using the STEP LOOP function. |
|
| [STEP] (KEY TRANSPOSE) button | When this button is lit, the white keyboard pads function as step pads [1]–[16]. Use this with the [SHIFT] button to configure KEY TRANSPOSE. |
 (sawtooth wave),
  (inverted sawtooth wave),
  (triangle wave),
  (square wave),
  ] (Square wave) knob
 ] (Sawtooth wave) knob
|
By turning the knobs while holding down the [SHIFT] button, you can access tone parameters that are different from the normal parameters. There is also a way to check the setting value without modifying them. |

4.
Controller |
Explanation |
|---|---|
| [SHIFT] button | Hold down the [SHIFT] button while pressing the various buttons to set the parameters and execute different functions. |
[HOLD] (MANUAL) button |
Turns the keyboard pad hold function on/off. Press the [SHIFT] + [HOLD] buttons for manual operations. When doing so, the current knobs positions are applied to the tone of the selected pattern.
|
| Keyboard pads |
Use these to play notes as with a regular keyboard, or use the pads to specify a scale and record to the sequencer. |