Number |
Name |
Explanation |
|
|---|---|---|---|
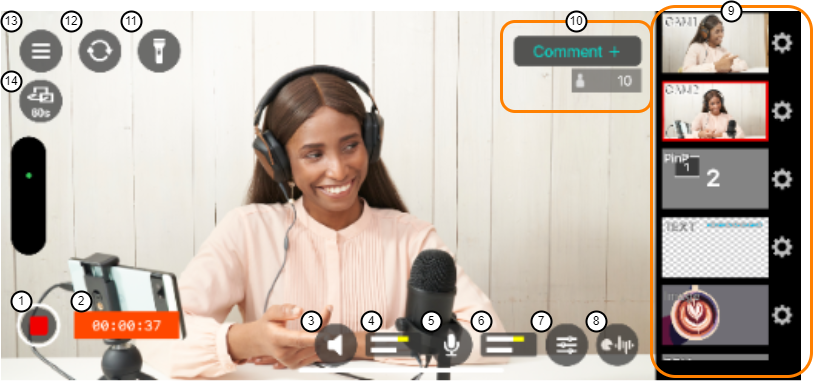
| 1 | Stream/record button | Switches between starting and ending livestreaming or recording. The stream/record button changes according to the current situation. |
|
|
|
Now getting ready to stream/record (streaming/recording has not yet begun). |
||
|
|
Now streaming or recording. |
||
|
|
Now connecting to server. When you start streaming, this is shown for several seconds from the time you press the stream/record button until streaming actually begins. |
||
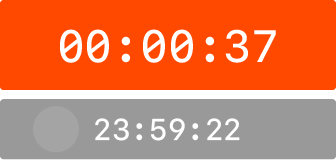
| 2 | Streaming/recording status indicator | Shows the livestreaming and video recording status. The information shown changes according to the streaming/recording state. |
|
|
|
Now streaming. The elapsed livestreaming time is shown. | ||
|
|
Now recording. The elapsed recording time and available recording time are shown. | ||
| 3 |
Output mute button |
Mutes the app’s audio output. | |
| 4 |
Output audio level meter |
Shows the app’s output level. | |
| Red: volume is too high. | |||
| Yellow: volume is appropriate. | |||
| White: volume is too low. | |||
| 5 | Mic mute button | Mutes the mic’s audio. | |
| 6 | Mic level meter | Shows the app’s input level. | |
| Red: volume is too high. | |||
| Yellow: volume is appropriate. | |||
| White: volume is too low. | |||
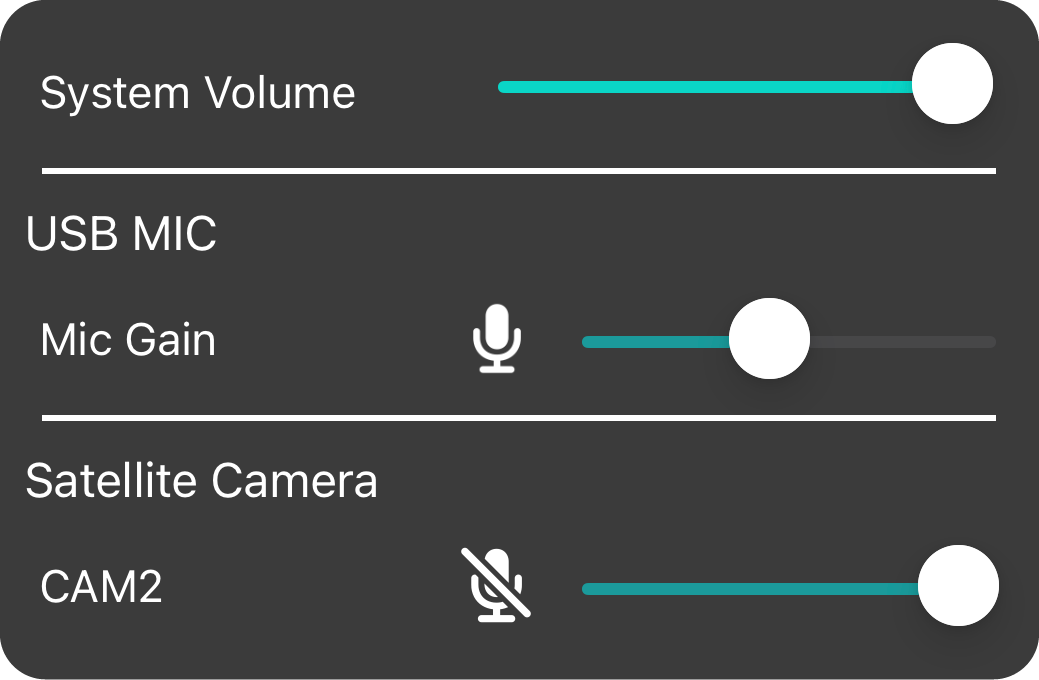
| 7 | Audio mixer button |
Configure the audio settings here.
|
|
|
System Volume |
Adjusts the smartphone volume. You can also operate this using the smartphone’s volume adjustment buttons.
|
||
|
USB MIC |
Sets the mic gain of the GO:PODCAST. |
||
|
Satellite Camera |
This adjusts the input volume of the satellite camera when a satellite camera is connected. |
||
| 8 | Reverb button | Adds reverb (acoustic reverberations) to the audio from the mic.
|
|
| 9 | Scene palette | Shows the scenes (video material), which include video from the camera as well as background music. You can register scenes as necessary in the scene palette, and switch between them.
|
|
|
Preset scene
|
A preset scene (standby video) is a scene that’s waiting to be output when the scene changes. When you tap a Movie scene or BGM scene that hasn’t been selected, that scene becomes the preset scene. At that time, a green border is shown around the preset scene. |
||
|
Output scene
|
The output scene is a scene that’s actually output from this unit during streaming, recording or other situations. At that time, a red border is shown around the output scene. The scene that was previously output is deselected. |
||
|
Scene in use
|
When the unit is outputting a PinP scene or split scene, a red border is shown at the four corners of the camera scenes that are being used in those scenes. Also, a red border is shown at the four corners of the scenes being used as materials for layering (including text, background music, movies and images). |
||
|
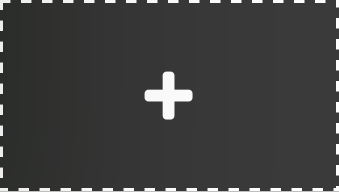
“Add scene” button (+ icon)
|
Adds a new scene to the scene palette. Adding scenes to a video source (camera scene) |
||
|
“Scene settings” button (gear icon)
|
Shows the detailed scene settings screen. |
||
| 10 | Comment button, number of viewers |
The comment button appears onscreen when you set the livestream destination to YouTube Live, Facebook Live or Twitch. When you press the comment button, the comment you posted is shown. The current number of viewers is shown during livestreaming.
|
|
| 11 | Lighting button | This operates the rear camera light when you are using the rear camera.
|
|
| 12 | Camera selector button | Switches between the front and rear camera on the satellite camera. When you’ve selected the built-in camera on the smartphone used for streaming as the scene, select the camera to use from the camera scene settings.
|
|
| 13 | Menu button | Shows the menu screen. | |
| 14 | Auto-switching icon | This is shown when the auto-switching function is enabled. Automatically switching between video scenes and composite video scenes (auto-switching) |
|