Here’s how to create a pattern by setting the sample playback timing at the position you like on the steps.
This method of recording is suitable for creating drum patterns.
- Press the [PATTERN SELECT] button.
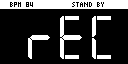
Press the [REC] button.
Empty pads in which no patterns have been recorded blink red.

The metronome sounds when the “Metronome:PTN” parameter is “ON” (the SYSTEM parameter “CLICK”).
Press pad [9] while holding down the [SHIFT] button to turn the metronome sound on/off.
Press pads [1]–[16] that are blinking red to select the record destination pattern.
The unit enters pattern record standby mode, and the RECORD SETTING screen appears.
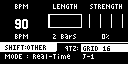
Press the [REMAIN] button.
The pattern recording method switches to “TR-REC”.
Set the parameters for the pattern.
Controller
Parameter
Value
Explanation
[CTRL 1] knob
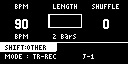
BPM
40–200
Sets the pattern’s tempo.
[CTRL 2] knob
LENGTH
1–64 (measures)
Sets the length of the pattern.
[CTRL 3] knob
SHFL RATE
-50–+50
You can set how much to slide the timing of the upbeats (the strength of the shuffle feel). A setting of “0” results in no shuffle.
Settings in the range of +10–16 generally give a pleasant shuffle feel.
[SHIFT] button + [CTRL 2] knob TIME SIGN 1/4–7/4
Specifies the time signature. [SHIFT] button + [CTRL 3] knob
METRO VOL
0–5
Sets the volume of the metronome.
[REMAIN] button
REC MODE
Selects how the pattern sequencer records.
Real-Time Records in real time.
The [REMAIN] button lights up at this time.
TR-REC Records using TR-REC.
The [REMAIN] button blinks at this time.
Press the [REC] button.
TR-REC pattern recording begins.
Press pads [1]–[16] while holding down the [SUB PAD] button to select the sample.
Set the parameters for the sample to input.
Controller
Parameter
Value
Explanation
[CTRL 1] knob
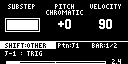
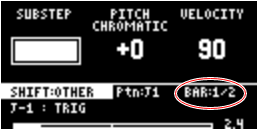
SUBSTEP
You can split up the steps into multiple and separate units (sub steps).
You can also configure how the split sub steps are played.
- This is enabled when MODE is “TRIG”.
Value
Pattern
1 ON 2 ON ON
3 a ON
ON ON b ON c ON d ON e ON ON f ON ON g ON ON 4 a ON ON ON ON b ON c ON d ON e ON f ON ON g ON ON h ON ON i ON ON ON j ON ON ON k ON ON ON l ON ON ON m ON ON n ON ON o ON ON HOLD STEP 1–32, LAST Sets the step length used for sample playback.
- This is enabled when MODE is “HOLD STEP”.
[CTRL 2] knob
PITCH
-12–+12
Sets the sample pitch.
[PITCH/SPEED] button CHROMATIC Set and input the sample’s pitch for each step in this mode.
Each step that’s input can be played back at a different pitch.
You can press the [VALUE] knob in this mode to select the scale.
Hold down and turn the [VALUE] knob to select a note from the scale.
PAD The sample’s pitch is input as a fixed pitch in this mode.
With this setting, all of the steps you input play back at the pitch you set in PITCH.
[CTRL 3] knob
VELOCITY
0–127
Specifies the dynamics (velocity) of the sample.
[SHIFT] button + [CTRL 1] knob BPM 40–200
Sets the pattern’s tempo. [SHIFT] button + [CTRL 2] knob
SHUFFLE
-50–+50
You can set how much to slide the timing of the upbeats (the strength of the shuffle feel). A setting of “0” results in no shuffle.
Settings in the range of +10–16 generally give a pleasant shuffle feel.
[SHIFT] button + [CTRL 3] knob START -50–99 (%) Sets the timing at which the sample starts playing back.
If this is set to a value other than 0%, sub steps cannot be set.
[REMAIN] button
MODE
This selects the input mode for TR-REC.
TRIG
The sample plays in each step. HOLD STEP
The steps play back joined at the length specified by the [CTRL 1] knob.
Joining two steps gives the same results as using a tie.
When MODE is set to “HOLD STEP”, the GATE parameter for the sample is automatically set to “ON”.
[HOLD] button - - Plays back only the selected pad.
Press pads [1]–[16] to select the step (timing) at which the sample plays back.
The sample is placed (input) into the step you selected using pads [1]–[16].
The pads light up corresponding to the steps that sound.
Press pads [1]–[16] to turn off the pads corresponding to the steps you don’t want to sound.
To input patterns from measure 2 onward, use the [VALUE] knob to select the measure (bar).
When you are finished recording the pattern, press the [EXIT] button twice.
Press the [EXIT] button once to finish recording. The recorded pattern is automatically saved to the pad.
Press twice to stop pattern playback.
Functions you can use during TR-REC input
You can use the controllers in combination during TR-REC input to perform the following operations.
Controller |
Explanation |
|---|---|
| [DEL] button + [A/F] button | Deletes the notes (for one measure) corresponding to the selected pad. |
| [DEL] button + [B/G] button | Deletes the notes (for one measure) corresponding to all pads. |
| [ROLL] button + [CTRL 1] knob | You can record the motion of [CTRL 1] knob in the steps.
|
| [ROLL] button + [CTRL 2] knob | You can record the motion of [CTRL 2] knob in the steps.
|
| [ROLL] button + [CTRL 3] knob | You can record the motion of [CTRL 3] knob in the steps.
|
| [VALUE] knob (hold down) + [SUB PAD] button + pads [1]–[16] | You can select samples without playing them back. |
|
|