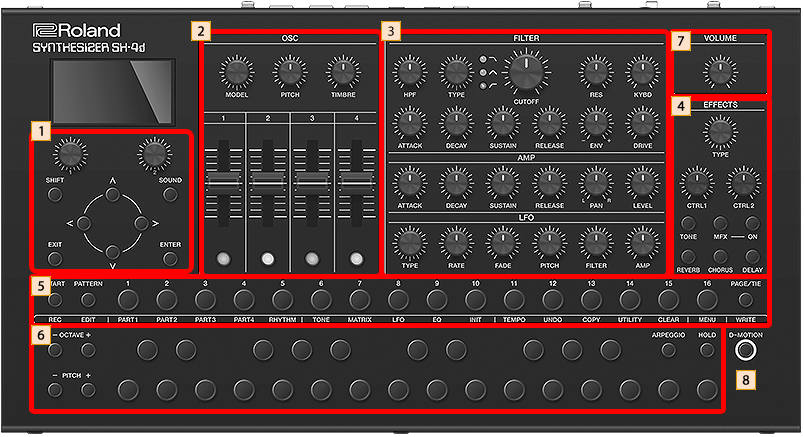
 Control section
Controller |
Explanation |
|---|---|
[SOUND] button |
Displays the tone list (sound browser) and switches between sounds (tones). |
[SHIFT] button |
When you press the [START], [PATTERN], [1]–[16] or [PAGE/TIE] buttons while holding down the [SHIFT] button, the operation listed below the respective button is executed. For the other buttons, a menu screen or the like corresponding to the button is shown. |
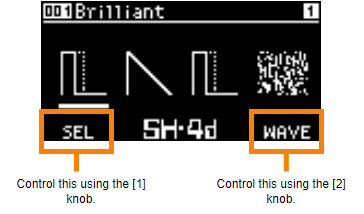
[1] [2] knobs |
Selects and sets the items on the screen.
|
[ç] [æ] [ä] [å] buttons |
Selects and sets the items on the screen. |
[ENTER] button |
Used for confirming a value or executing an operation. |
[EXIT] button |
Returns you to the previous screen.
|
 OSC section
Controller |
Explanation |
|---|---|
[MODEL] knob |
The function changes depending on the currently selected part (current part). For parts 1–4 (tone parts), this switches between oscillator models. |
| [PITCH] knob | Sets the pitch in semitone units. |
| [TIMBRE] knob | Changes the tonal quality of the oscillator tone. The functions of this control change depending on the oscillator model. Ø “Oscillator Model” |
[OSC 1]–[OSC 4] sliders |
The functions of these controls change depending on the oscillator model. |
 FILTER/AMP/LFO section
Section |
Controller |
Explanation |
|
|---|---|---|---|
FILTER |
[HPF] knob |
Sets the cutoff frequency of the -6dB/Oct high-pass filter. |
|
[TYPE] knob |
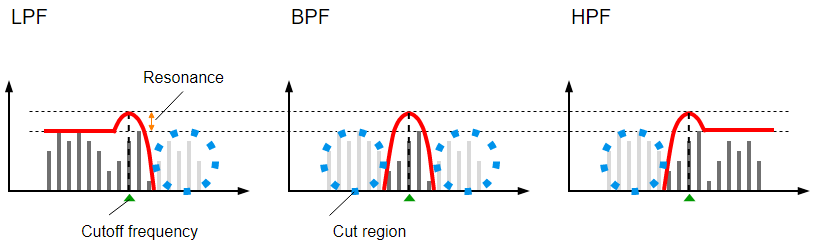
Select the filter type. LPF: A -24dB/Oct low-pass filter. This cuts off frequencies above the cutoff frequency. Cutting off the high frequencies makes the sound more mellow. This is the most frequently-used type. |
||
[CUTOFF] knob |
Sets the cutoff frequency of the filter. |
||
[RES] knob |
Emphasizes the frequencies around the filter’s cutoff frequency (resonance).
|
||
[KYBD] knob |
Adjusts how much the cutoff frequency changes according to the note you play on the keyboard (key follow). |
||
[ATTACK] knob |
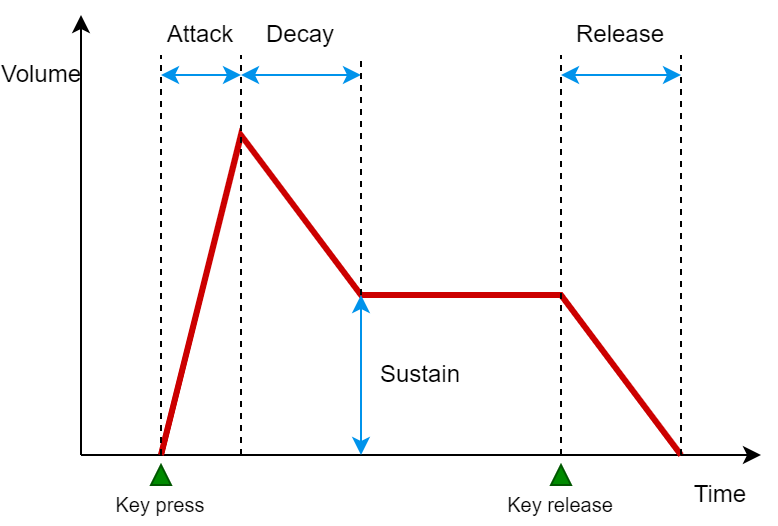
Sets the attack time of the filter envelope. |
|
|
[DECAY] knob |
Sets the decay time of the filter envelope. |
||
[SUSTAIN] knob |
Sets the sustain level of the filter envelope. |
||
[RELEASE] knob |
Sets the release time of the filter envelope. |
||
[ENV] knob |
Adjusts how much the cutoff frequency changes according to the filter envelope. |
||
[DRIVE] knob |
Adjusts how much the filter distorts the signal. |
||
AMP |
[ATTACK] knob |
Sets the attack time of the amp envelope. |
|
[DECAY] knob |
Sets the decay time of the amp envelope. |
||
[SUSTAIN] knob |
Sets the sustain level of the amp envelope. |
||
[RELEASE] knob |
Sets the release time of the amp envelope. |
||
[PAN] knob |
Sets the panning of each part’s sound when using stereo output. |
||
[LEVEL] knob |
Adjusts the part volume. |
||
LFO |
[TYPE] knob |
Sets the LFO waveform. SINE: sine wave |
|
[RATE] knob |
Sets the speed of the LFO cycle. |
||
[FADE] knob |
Sets how long it takes for the LFO to reach maximum amplitude. |
||
[PITCH] knob |
Sets how much the LFO affects the pitch. |
||
[FILTER] knob |
Sets how much the LFO affects the cutoff frequency. |
||
[AMP] knob |
Sets how much the LFO affects the volume. |
||
 Effects section
The SH-4d features one multi-effect unit (Tone MFX) per part, as well as four pattern effect units (Multi-effect (MFX), Delay, Chorus and Reverb) that are applied to the mix of all parts.
Before using the [CTRL 1] and [CTRL 2] knobs to operate the effects, press the [TONE]–[DELAY] buttons in the effect section to select the effect you want to operate.
- For details on the effects, refer to “MFX Parameters”.
Controller |
Explanation |
|---|---|
[TYPE] knob |
Switches between the type of effect you select. |
[CTRL 1] [CTRL 2] knobs |
Sets the parameters for the effect you selected.
|
[TONE] button |
Quick press: Selects the tone effect. Long-press: Shows the tone effect settings screen.Ø “MFX Parameters” |
[MFX] button |
Quick press: Selects the pattern MFX. |
MFX [ON] button |
Switches the pattern MFX on/off, regardless of which effect is selected. |
[REVERB] button |
Quick press: Selects the pattern reverb. |
[CHORUS] button |
Quick press: Selects the pattern chorus. |
[DELAY] button |
Quick press: Selects the pattern delay. |
|
Hold down the [SHIFT] button and press each button in the effect section to display the setting screen for each effect. |

 Step sequencer section
Controller |
Explanation |
|---|---|
[START] button |
Plays/stops the sequencer. |
[PATTERN] button |
Turn this on (the button lights up) to switch to the PATTERN screen. The unit enters pattern mode. |
[1]–[16] buttons |
Use these to input notes into the step sequencer. |
[PAGE/TIE] button |
Switches between the sequencer steps (pages) that are operated with the [1]–[16] buttons. |
Functions when holding down the [SHIFT] button and pressing the [START] [PATTERN], [1]–[16] and [WRITE] buttons
Controller |
Explanation |
|---|---|
| [START] (REC) | Switches the step sequencer to Realtime Rec mode. Ø “Recording Your Performance in Real Time (Real-time Input)” |
| [PATTERN] (EDIT) | Shows the PATTERN SETTINGS screen. |
[1] (PART1) |
Selects part 1. |
[2] (PART2) |
Selects part 2. |
[3] (PART3) |
Selects part 3. |
[4] (PART4) |
Selects part 4. |
[5] (RHYTHM) |
Selects part R. |
[6] (TONE) |
Shows either the TONE screen or the RHYTHM KIT screen. |
[7] (MATRIX) |
Shows the MATRIX screen. |
[8] (LFO) |
Shows the LFO screen. |
[9] (EQ) |
Shows the TONE EQ screen. |
[10] (INIT) |
When the current part is a tone part: Initializes the tone. |
[11] (TEMPO) |
Shows the PATTERN TEMPO screen. |
[12] (UNDO) |
Undoes the most recent sequencer operation, such as the note you inputted or deleted (UNDO). |
[13] (COPY) |
Shows the COPY screen. |
[14] (UTILITY) |
Shows the PATTERN UTILITY screen. |
[15] (CLEAR) |
When the current part is a tone part: Erases all notes in the step sequencer. On the PATTERN screen, this erases all notes in all parts. |
[16] (MENU) |
Shows the MENU screen. |
| [PAGE/TIE] (WRITE) | Shows the WRITE MENU screen. |
 Keyboard section
Controller |
Explanation |
|---|---|
OCTAVE [-] [+] buttons |
Switches between octaves for the keyboard section. |
PITCH [-] [+] buttons |
Applies pitch bend to the currently selected part while you hold down the buttons. |
Keyboard buttons |
Use these buttons as a keyboard. These can be used in combination with the [1]–[16] buttons to input notes into the sequencer.
|
[ARPEGGIO] button |
Turns the arpeggio on/off. |
[HOLD] button |
Turns the arpeggio hold on/off. |
 [VOLUME] knob
Adjusts the volume.
 [D-MOTION] button
Turns the D-Motion function on/off, which controls the tones according to the angle at which this unit is tilted.
For details, refer to “Using D-MOTION”.
When using this function, firmly grip both sides of this unit and be careful that the connected cables are not excessively bent.