Explanation of elements used on this screen
KIT screen (explanation of each icon and the information shown)
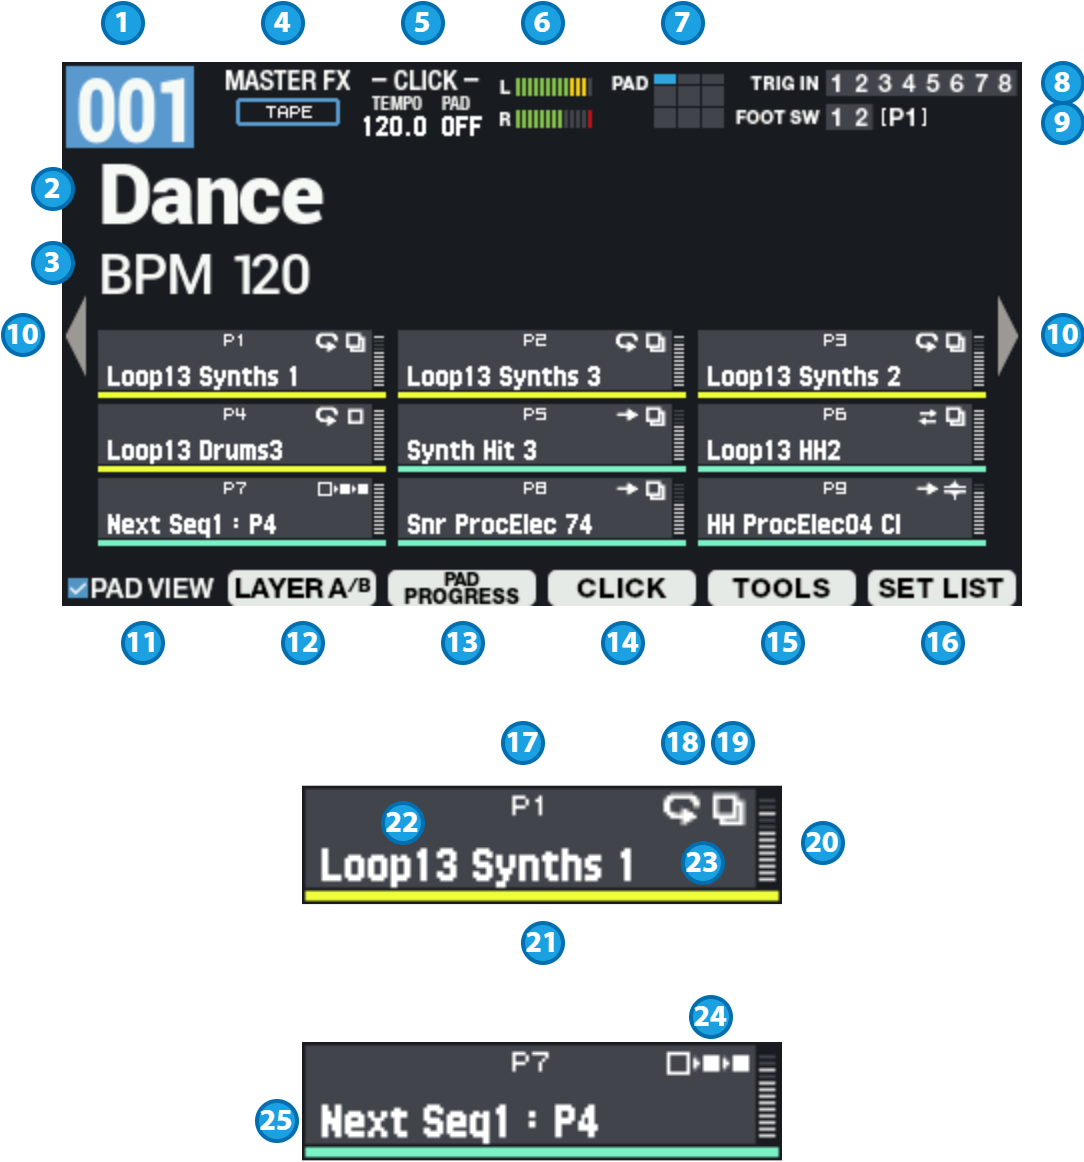
Number |
Explanation |
||||||
|---|---|---|---|---|---|---|---|
| 1 | Shows the kit number (1–200). |
||||||
| 2 | Shows the kit name (maximum of 16 characters). |
||||||
| 3 | Shows the kit memo (maximum of 64 characters). |
||||||
| 4 | Turns the master effect on/off and shows the effects assigned to the master effect. |
||||||
| 5 | Shows the click tempo and the state of the click start pad. |
||||||
| 6 | Shows the master out level (the level of the signal before the [MASTER] knob). |
||||||
| 7 | Shows the currently selected pad in blue. Click start pads are shown with a red border. |
||||||
| 8 | Shows the currently selected TRIG IN in blue. Click start pads are shown with a red border. |
||||||
| 9 | Shows the currently selected FOOT SW in blue. Click start pads are shown with a red border. |
||||||
| 10 |
Use the cursor [ã] [â] buttons to switch between information shown in the KIT screen.
|
||||||
| 11 | [F1] (PAD VIEW) button Shows/hides the information for each pad that’s shown on the top screen. |
||||||
| 12 | [F2] (LAYER A/B) button Switches between layer A and layer B view, when the information for each pad is shown on the top screen. |
||||||
| 13 | [F3] (PAD PROGRESS) button Sets the status view for each pad that’s playing, when the information for each pad is shown on the top screen.
|
||||||
| 14 | [F4] (CLICK) button Shows the tempo setting window. |
||||||
| 15 | [F5] (TOOLS) button Groups together the functions you frequently use as a tool. Shortcuts for Useful Functions (TOOLS) is shown. |
||||||
| 16 | [F6] (SET LIST) button Shows the window for recalling a set list. |
||||||
| 17 | Shows the pad number. |
||||||
| 18 | Shows the ONE SHOT/ALTERNATE/LOOP layer state as an icon. | ||||||
| 19 | Shows the on/off state for layer A/B. A hi-hat icon is shown when Layer Type is set to “HI-HAT”. |
||||||
| 20 | Shows the output level for each pad. | ||||||
| 21 | Shows the pad LED color. | ||||||
| 22 | Top row: layer A sound progress Bottom row: layer B sound progress |
||||||
| 23 | Shows the name of the wave assigned to the layer. | ||||||
| 24 | This icon indicates that this is a pad sequence pad (a pad used to move the pad sequence forward). |
||||||
| 25 | When you strike a pad sequence pad, the number of the next step and the pad that sounds is shown. Making Pads Play in a Predetermined Sequence (PAD SEQUENCE) |
||||||
TRIGGER IN/FOOT SW screen (explanation of each icon and information)
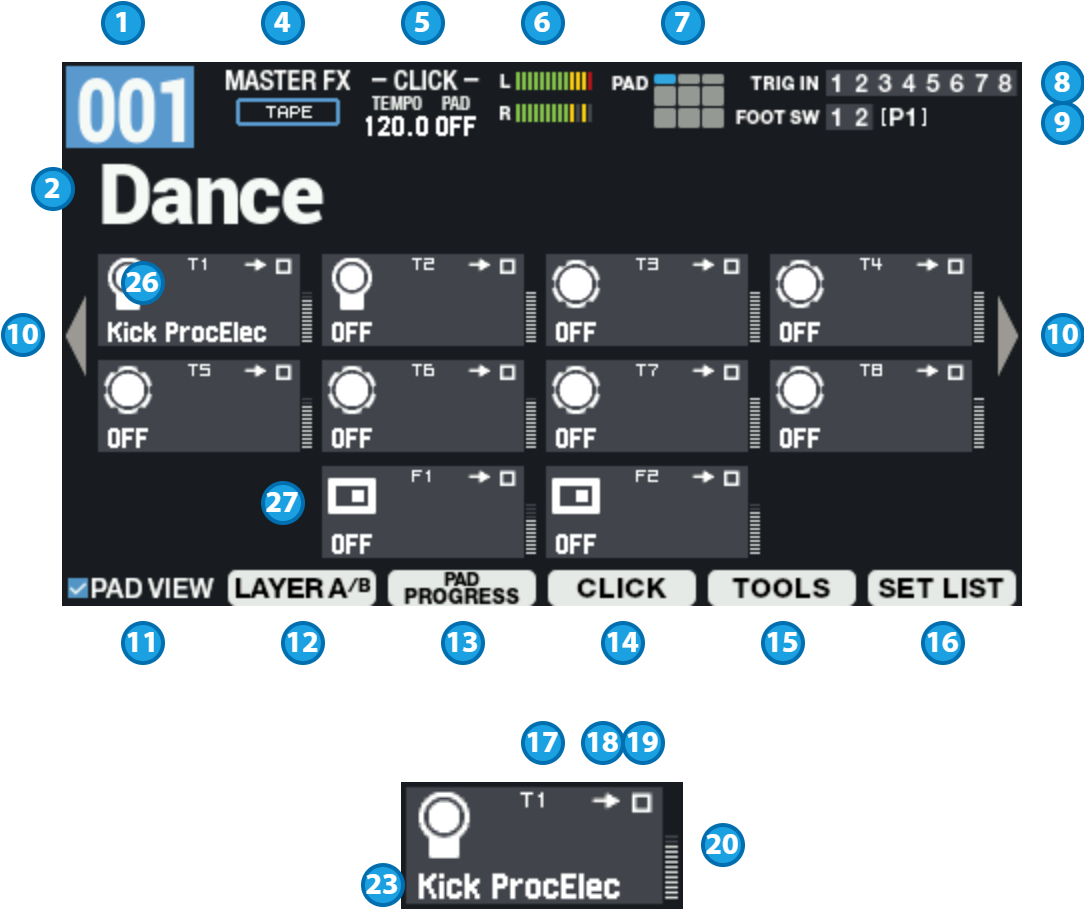
Number |
Explanation |
|---|---|
| 26 | Shows information for TRIGGER IN 1–8. |
| 27 | Shows information for FOOT SW 1–2. |
Level meter screen (explanation of each icon and the information shown)
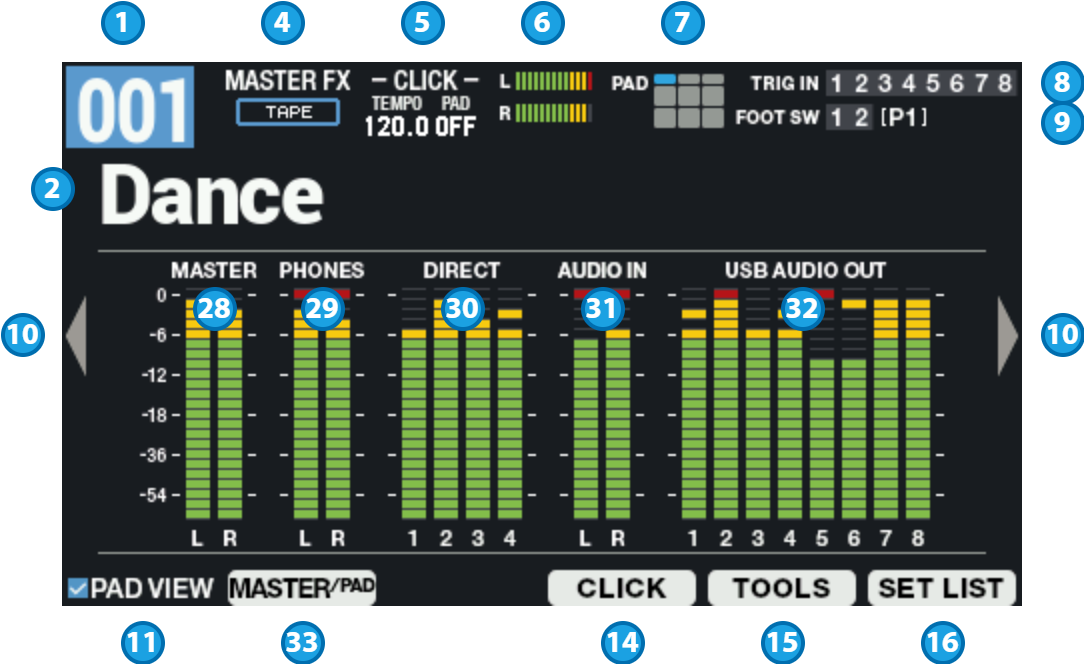
Number |
Explanation |
||||||||||||||||
|---|---|---|---|---|---|---|---|---|---|---|---|---|---|---|---|---|---|
| 28 | Shows the MASTER OUT level (the level of the signal before the [MASTER] knob). | ||||||||||||||||
| 29 | Shows the PHONES OUT level (the level of the signal before the [PHONES] knob). | ||||||||||||||||
| 30 | Shows the DIRECT OUT 1–4 levels. | ||||||||||||||||
| 31 | Shows the AUDIO IN level. | ||||||||||||||||
| 32 | Shows the USB AUDIO OUT level.
|
||||||||||||||||
| 33 | [F2] (MASTER/PAD) button Switches between master level and pad level view, when the level meter top screen is shown on the top screen. |
How to use the KIT screen
Changing the current pad (PAD SELECT)
Although you can strike a pad with your stick to change the current pad, you can also do this with just the panel buttons.
- Hold down the [ENTER] button and press the cursor [ã] [â] buttons.
Locking the pads (PAD LOCK)
Use the pad lock feature to prevent the pads you set from switching when you strike them.
This is useful when you want to lock a certain pad while you’re editing, for example.
Hold down the [SHIFT] button and press the [MENU] button.
The pad is locked, and an icon like the one in the illustration appears on the screen.
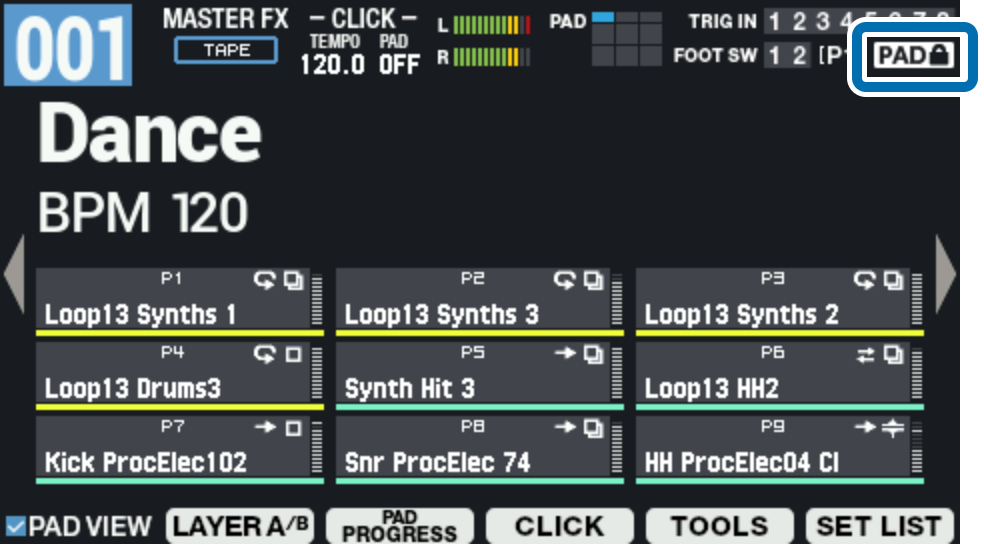
- To unlock, hold down the [SHIFT] button again and press the [MENU] button.
Checking the pad sounds in headphones only (PAD CHECK)
You can use just the headphones to check the sound of the pads you strike.
|
The following effects are not applied.
|
With this function, no sound is output from the MAIN/DIRECT OUT jacks, which is useful when you’re playing live or in similar situations where you want to preview the sound of the pads just by yourself.
- While holding down the [PAD CHECK] button, press the pad of the sound that you want to check.
Using the PAD PREVIEW/PLAYER function
With PAD PREVIEW, when you press the [PAD CHECK] button while it is blinking, you can check the sounds that are assigned to the pads at a fixed velocity.
With PAD PLAYER, you can operate the BWD, FWD, PLAY and other buttons while the PAD PREVIEW/PLAYER window is shown to play the sounds back from a specified time. This lets you play back a longer backing part from the middle to check it.
Hold down the [SHIFT] button and press the [PAD CHECK] button.
The PAD CHECK button blinks and the PAD PREVIEW/PLAYER function turns on.
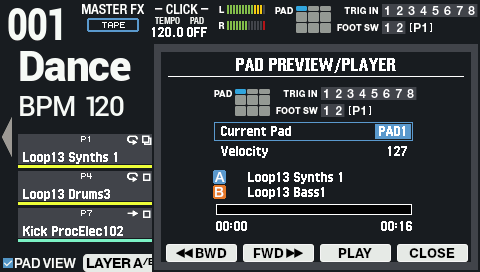
Current Pad
Selects the current pad.
You can also select the current pad by holding down the [ENTER] button and pressing the cursor [ã] [â] buttons.Velocity
Set the velocity value used for previewing the sounds.
[F3] BWD
Moves the playback start position of the [F5] PLAY button five seconds earlier. When you press the button during playback, this rewinds five seconds.
[F4] FWD
Moves the playback start position of the [F5] PLAY button five seconds later. When you press the button during playback, this fast-forwards five seconds.
[F5] PLAY (STOP) (*1)
Press this button to play back from the start position that’s set.
This changes to STOP when playing back, and playback stops when you press the button.[F6] CLOSE
Closes the PAD PREVIEW/PLAY screen.
*1: The LAYER “Loop” settings and “Decay” settings are disabled when you play back using the [F5] PLAY button.
Press the [PAD CHECK] button.
This lets you play the current pad (PREVIEW).
- To turn the PAD PREVIEW/PLAYER function off, press and hold down the [SHIFT] button again, and then press the [PAD CHECK] button to make PAD CHECK stop blinking.
Entering safety mode
This function eliminates the need to worry about accidentally operating the wrong buttons or knobs.
When using this function, the unit limits you to only the bare minimum of functions during a live performance.
Hold down the [SHIFT] button and press the [KIT] button.
The unit enters safety mode. The [KIT] button blinks.
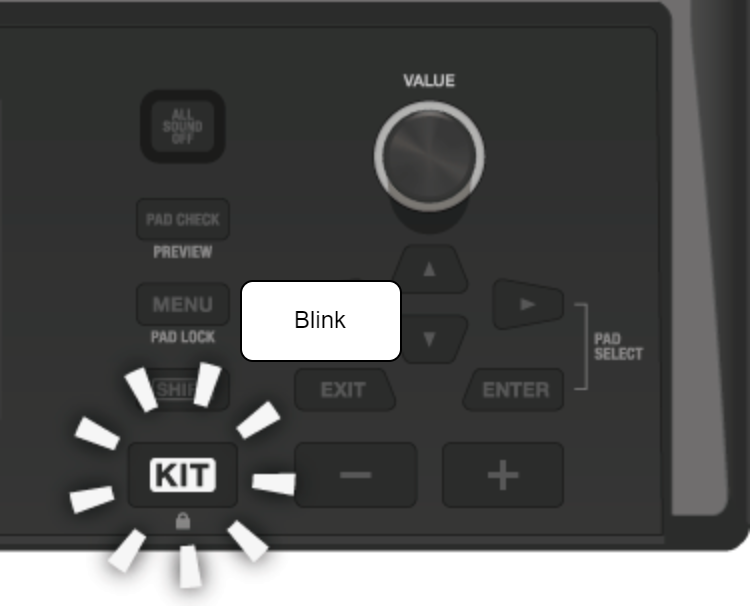
You can do the following things in this mode.
- Switching between kits
- Starting and stopping the click
- Pressing the [ALL SOUND OFF] button
- Adjusting the volume (MASTER/PHONES/CLICK)
- Switching between screen views using the cursor [ã] [â] buttons
To unlock, hold down the [SHIFT] button again and press the [KIT] button.
