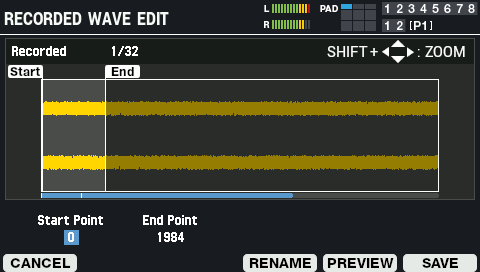
On the SAMPLING screen, press the [F6] (WAVE EDIT) button.
The wave edit screen appears.

Parameter
Explanation
Start Point
Sets the start point.
This clips everything in the waveform off that comes before this position.End Point
Sets the end point.
This clips everything in the waveform off that comes after this position.Button
Explanation
[F1] (CANCEL)
Exits WAVE EDIT mode.
[F4] (RENAME)
Edits the wave name.
[F5] (PREVIEW)
Previews the sampled waveform.
[F6] (SAVE)
Saves the sampled waveform to this unit’s memory.
Along with saving, this lets you assign the wave to the pads of the currently selected kit.
Cursor [ã] [â] buttons
Selects a parameter.
[-] [+] buttons
Edits the setting.
[SHIFT] button + cursor [à] [á] [ã] [â] button
Zooms the displayed waveform in/out.
Editing the name of a wave (RENAME)
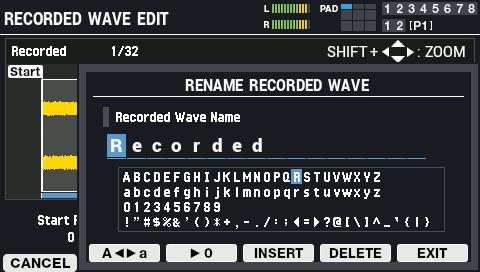
On the Wave edit screen, press the [F4] (RENAME) button.
The RENAME RECORDED WAVE window appears.

- Use the cursor [ã] [â] buttons to move the cursor.
Use the [-] [+] buttons to select the character.
You can also use the [VALUE] knob to select a character.
Button
Explanation
[F2] (Aãâa)
Toggles between uppercase/lowercase.
[F3] (â0)
Switches to numeric input.
[F4] (INSERT)
Inserts a space at the cursor position.
[F5] (DELETE)
Deletes the character at the cursor position.
[F6] (EXIT)
Exits and returns to the previous screen.
Press the [F6] (EXIT) button.
This exits the rename operation and returns to the previous screen.
SAVE
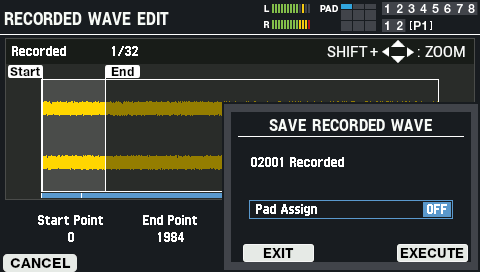
On the Wave edit screen, press the [F6] (SAVE) button.
The SAVE RECORDED WAVE window appears.

Press the [-] [+] buttons to set where the wave is to be assigned when you save it.
You can also set this by striking the pads.
Parameter
Value
Explanation
Pad Assign
OFF, PAD1-A–FOOT SW2-B
Sets the layer for the assign destination.
Button
Explanation
[F4] (EXIT)
Closes the SAVE RECORDED WAVE window.
[F6] (EXECUTE)
Saves the sample.
To execute, press the [F6] (EXECUTE) button.
To cancel the operation, press the [F4] (EXIT) button.