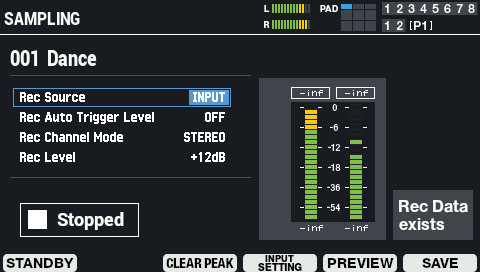
This section shows you how to sample sounds to create waves.
- Select [MENU] Ó “WAVE”.
Use the cursor [à] [á] [ã] [â] buttons to select “SAMPLING” and press the [ENTER] button.
The SAMPLING screen appears.

Use the cursor [à] [á] buttons to select the parameter, and use the [VALUE] knob or the [-] [+] buttons to edit the sampling settings.
Parameter
Value
Explanation
Rec Source (*1) INPUT, PAD, INPUT+PAD Selects the source to sample.
INPUT: Samples only the audio input from an external device.
PAD: Samples only what you play on this instrument.
INPUT+PAD: Samples what you play on this instrument as well as the audio input from an external device.Rec Auto Trigger Level OFF, 1–10 Sets the auto-trigger level (the input threshold level at which sampling automatically starts).
When this is set to a value from 1 to 10, sampling automatically begins when the unit is in sampling standby mode and an input signal is received that equals or exceeds the value you set.Rec Channel Mode MONO, STEREO Sets whether to save the sampled waveform in mono or in stereo. Rec Level -24–+24 dB Sets the recording level for the sample in question. *1: The maximum sampling time per sample is 60 min. (when “Rec Source” is “INPUT”) or 10 min. (when “Rec Source” is “PAD” or “INPUT+PAD”).
Button
Explanation
[F1] (STANDBY) Enters sampling standby mode. [F3] (CLEAR PEAK) Resets the peak indicators. [F4] (INPUT SETTING) Switches to the audio input settings screen.
AUDIO IN[F5] (PREVIEW) Previews the sampled waveform. If you press [F5] (PREVIEW) again, playback stops. [F6] (WAVE EDIT) Edits the sampled waveform.