- Select [MENU] Ó “SYSTEM”.
Use the cursor [à] [á] [ã] [â] buttons to select “PAD/TRIG IN” and press the [ENTER] button.
The PAD / TRIG IN screen appears.
Use the [F1]–[F3] buttons to switch between settings screens.
Button
Explanation
[F1] (PARAM) Configures the pad sensitivity and TRIGGER IN jack settings.
[F2] (HI-HAT) Configures the hi-hat settings.
[F3] (MONITOR) Monitors the velocity.
Use the cursor [à] [á] buttons to select a parameter, and then use the [-] [+] buttons to change the setting.
PARAM
Below are the parameters for configuring the pad sensitivity and TRIGGER IN jack settings.

Parameter
Value
Explanation
Input Mode
When a pad on this unit is selected: ---
When TRIG 1–8 is selected: HEAD&RIM, TRIGx2
Set this to connect either one drum trigger to one TRIGGER IN jack (HEAD&RIM), or two drum triggers (TRIGx2).
Trig Type When a pad on this unit is selected: ---
When TRIG 1–8 is selected: KD-A22, KD-200, KD-140,
KD-120, KD-85, KD-10, KD-9, KD-8, KD-7,
KT-10, KT-9, PDA120L, PDA100L, PD-128,
PD-125X, PD-125, PD-108, PD-105X, PD-105,
PD-85, PDX-100, PDX-12, PDX-8, PDX-6, PD-8,
VH-11, VH-10, CY-16R-T, CY-15R, CY-14C-T,
CY-14C, CY-13R, CY-12C, CY-12R/C, CY-8,
CY-5, BT-1, BT-1 SENS, PAD1, PAD2, PAD3,
RT-30K, RT-30HR, RT-30H SN, RT-30H TM, RT-10K, RT-10S, RT-10TSpecifies the model of drum trigger (trigger type) that is connected to each trigger input.

When you set a trigger type, the trigger parameters except for certain parameters (such as crosstalk cancel) are set to the recommended values intended for onstage use. (The “Threshold” value on the SPD-SX PRO is set higher than usual.)
These values are only general guidelines, so you can make fine-tune the settings according to how you attach the drum triggers and how they are to be used.Sensitivity 1.0–32.0 Use this to adjust the sensitivity of the pads, as well as the balance between how hard you strike the pads and the volume of sound that is produced.
Increasing this value increases the sensitivity, so that even soft strikes on the pad play loudly.
Decreasing this value decreases the sensitivity, so that even strong strikes on the pad play softly.Rim Gain (*1) 0–3.2 Adjusts the balance between the force of striking the rim or edge and the loudness of the sound.
If you increase this value, even soft strikes on the rim play at high volume.
If you decrease this value, even strong strikes on the rim play at low volume.
This is available for pads that support rim shots.Threshold 0–31 Minimum sensitivity of the pads
This setting allows a trigger signal to be received only when a pad is struck above a determined force level (velocity).
This can be used to prevent a pad from sounding due to vibrations from other pads.
In the following example, the B signal sounds, but A and C do not sound.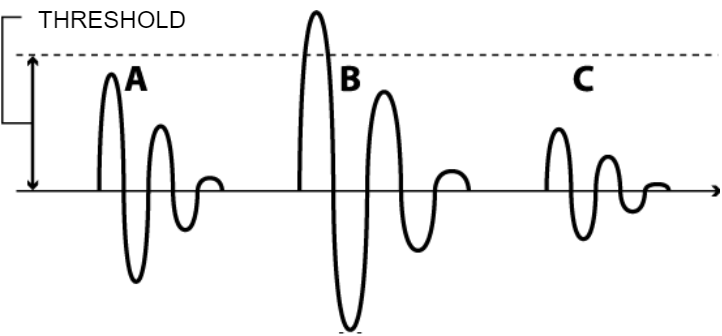
Check this by gradually increasing the value while playing the pad.
If a soft strike on the pad fails to make a sound, slightly lower this value.
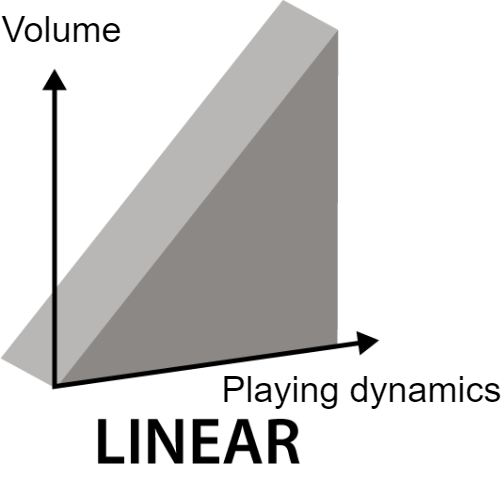
Repeat this to obtain the ideal setting.Curve Volume change in response to pad strike strength LINEAR, This is the standard setting. This produces the most natural balance between playing dynamics and volume change.
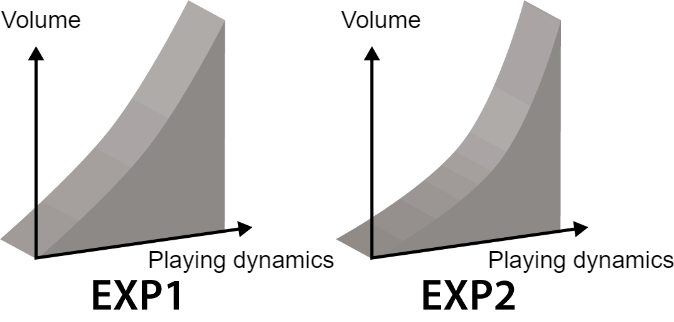
EXP1, EXP2, Compared to “LINEAR”, strong dynamics produce a greater change.
LOG1, LOG2, Compared to “LINEAR”, a soft playing produces a greater change. 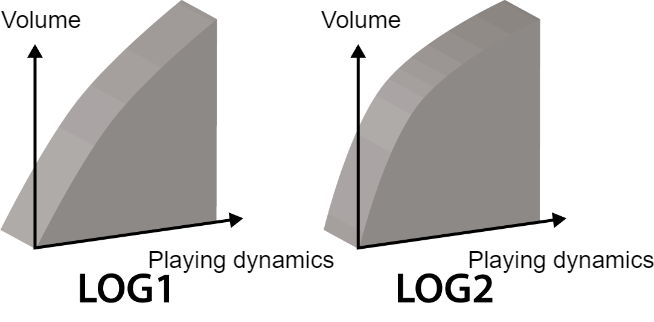
SPLINE, Extreme changes are made in response to your playing dynamics. 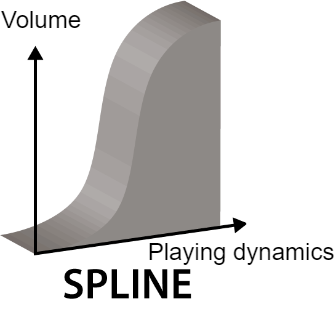
LOUD1, LOUD2 Very little dynamic response, making it easy to maintain strong volume levels.
If you’re using a drum trigger as an external pad, these settings will produce reliable triggering.
Head/Rim Adjust
(*1) (*2)0–80 This setting specifies how easy it is to play a head shot or rim shot.
If the rim sound is heard when you strike the head strongly, increase this value.
If the head sound is heard when you play an open rim shot, decrease this value.
If the head sound is heard when you softly play a rim shot, decrease this value.
If the rim shot sound is heard when you play a head shot, or if a head shot sound is heard when you play a rim shot, make small changes to the Head/Rim Adjust values while you continue trying out the results.
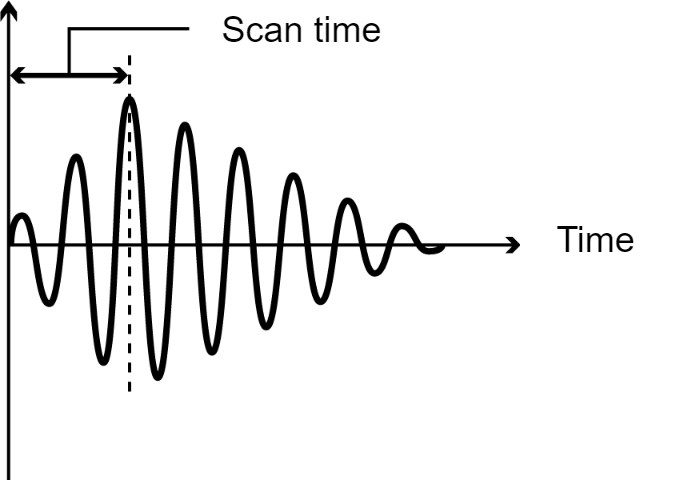
Extreme changes to the values will cause the wrong sound to be heard when you strike the pad, for example producing the rim shot sound when you play a head shot.Scan Time (*1) 0–4.0 ms Trigger signal detection time
Since the rise time of the trigger signal waveform may differ slightly depending on the characteristics of each pad or acoustic drum trigger (drum pickup), you may notice that identical hits (velocity) may produce sound at different volumes.
If this occurs, you can adjust the trigger signal detection time (“Scan Time”), so that your way of playing can be detected more precisely.
While repeatedly hitting the pad at a constant force, gradually raise the “Scan Time” value beginning at “0”, until the resulting volume stabilizes at the loudest level.
At this setting, try both soft and loud strikes, and make sure that the volume changes appropriately.- Higher values result in more time required for the sound to play. Set this to as low a value as possible.
Mask Time (*1) 0–64 ms Prevention of double triggering
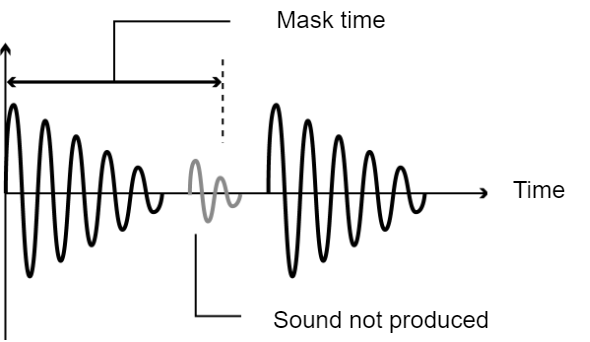
When playing a kick trigger, the beater can bounce back and hit the head a second time immediately after the intended note, which causes a single hit to “double trigger” (two sounds instead of one).
The “Mask Time” setting helps to prevent this. Once a pad is hit, any additional trigger signals occurring within the specified mask time are ignored.
Adjust the Mask Time value while playing the pad.
When using a kick trigger, adjust the Mask Time by raising the value while pressing the pedal repeatedly, so that sounds no longer retrigger when the beater rebounds.
Increasing this value makes notes played in rapid succession more likely to drop out.
Set this to as low a value as possible.
If two or more sounds are being produced when you strike the pad just once, adjust “Retrigger Cancel”.
Retrigger Cancel (*1) 1–16 Trigger signal decay detection
When you strike a snare drum or other drum to which a commercially available drum trigger is attached, another trigger might unintendedly occur at point “A” in the following illustration (retriggering) due to irregularities in the waveform.
This occurs in particular at the decaying edge of the waveform.
Retrigger Cancel detects such irregularities to prevent retriggering.
While repeatedly striking the pad, raise the “Retrigger Cancel” value until retriggering no longer occurs.
Although setting this to a high value prevents retriggering, this also makes it easier for sounds to be omitted when the pad is repeatedly struck quickly.
Set this to the lowest value possible while still ensuring that there is no retriggering.
You can also eliminate double triggering by adjusting the Mask Time setting.
Mask Time does not detect trigger signals if they occur within the specified amount of time after the previous trigger signal was received. Retrigger Cancel detects the decay of the trigger signal level, and triggers the sound after internally determining which trigger signals were actually generated when the head was struck, while weeding out the other false trigger signals that should not trigger a sound.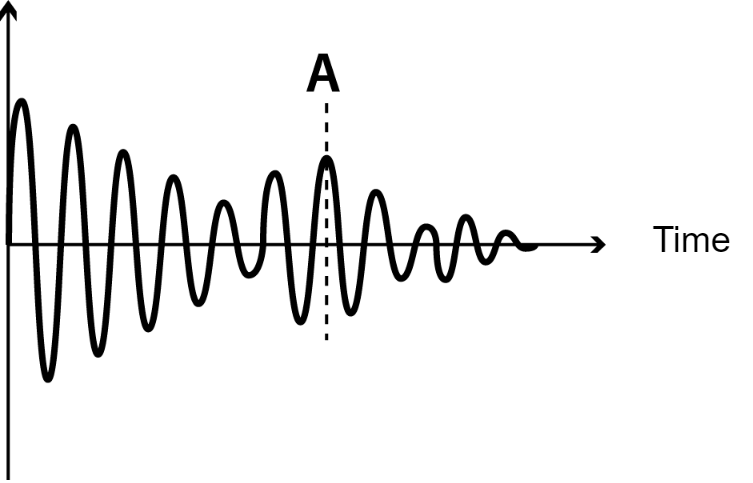
Ext Noise Cancel (*1) (*2) OFF, 1–5 This setting lets you prevent a drum from being triggered unintentionally (by using noise cancellation) when you strike a different drum that doesn’t have a drum trigger, or when ambient sounds or vibration are picked up.
This noise cancel function can be used if you use a stereo cable to connect an RT-30K or RT-30HR drum trigger to the following TRIGGER IN jacks and specify the Trig Type.- The RT-30H does not support the noise cancel function.
XTalk Cancel (*1) 0–80 % Strength of crosstalk cancellation
If two pads are attached to the same stand, the vibration from one struck pad may cause the other pad to sound without your intention. This is called “crosstalk”. Crosstalk cancellation is a setting that prevents this type of crosstalk. For example, if pad B unintendedly sounds when you strike pad A, increase the XTalk Cancel (Cross Talk Cancel) value of pad B until crosstalk no longer occurs. If this value is raised excessively and pad A and pad B are struck simultaneously, the pad that is struck with less strength tends to drop out. Set this value to the lowest possible value at which crosstalk no longer occurs.

Before you set crosstalk cancel, you can prevent crosstalk by positioning the pads in a way that makes them less susceptible to external vibrations. Please note the following points when setting up your system.
- Don’t place pads in contact with each other.
- If attaching multiple pads to the same stand, increase the distance between them.
- Firmly tighten the knobs that fasten the pad to ensure that the pad is securely attached to the stand.

In some cases, the acoustic sound from an acoustic drum or from a monitor speaker might cause a pad to be triggered. In such cases, adjusting the crosstalk cancelation settings will not solve the problem. Pay attention to the following considerations when setting up your equipment.
- Set up the pads at a distance from the speakers
- Angle the pads, placing them where they are less likely to be affected by the sound
- Increase the pad’s Threshold value
*1: For TRIG IN 1–8 only.
*2: This cannot be set for some Trig Type settings that are selected (the display shows “---” in this case).HI-HAT
Configures the hi-hat settings.
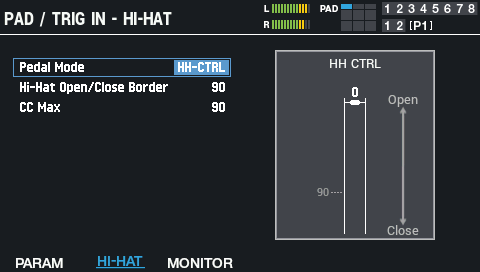
If you’ve assigned the VH series to a TRIGGER IN, the message “Adjust the offset with the offset adjustment screw.” is shown.
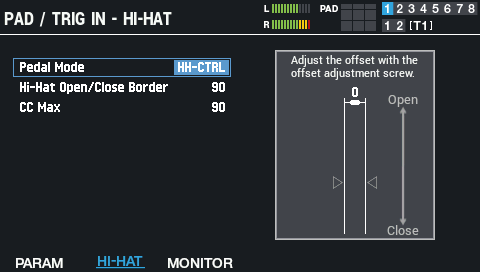
Parameter
Value
Explanation
Pedal Mode HH-CTRL,
EXP-CTRLSwitches between functions for the HH CTRL/EXPRESSION jack. HH CTRL and EXPRESSION cannot be used at the same time. Hi-Hat Open/Close Border 0–127 Sets the pedal position used to switch between the open and closed sounds for pads whose “Layer Type” is set to “HI-HAT”. CC Max 90, 127 Sets the control change value that’s transmitted when the hi-hat pedal is depressed completely. MONITOR
Monitors the velocity.
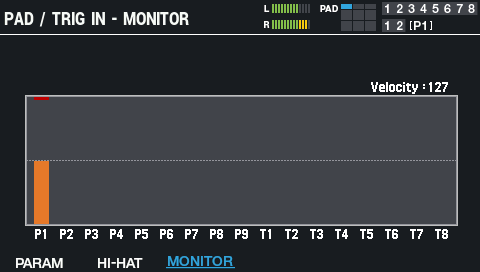
When you strike a pad, the input strength is shown on the graph.