Top Panel

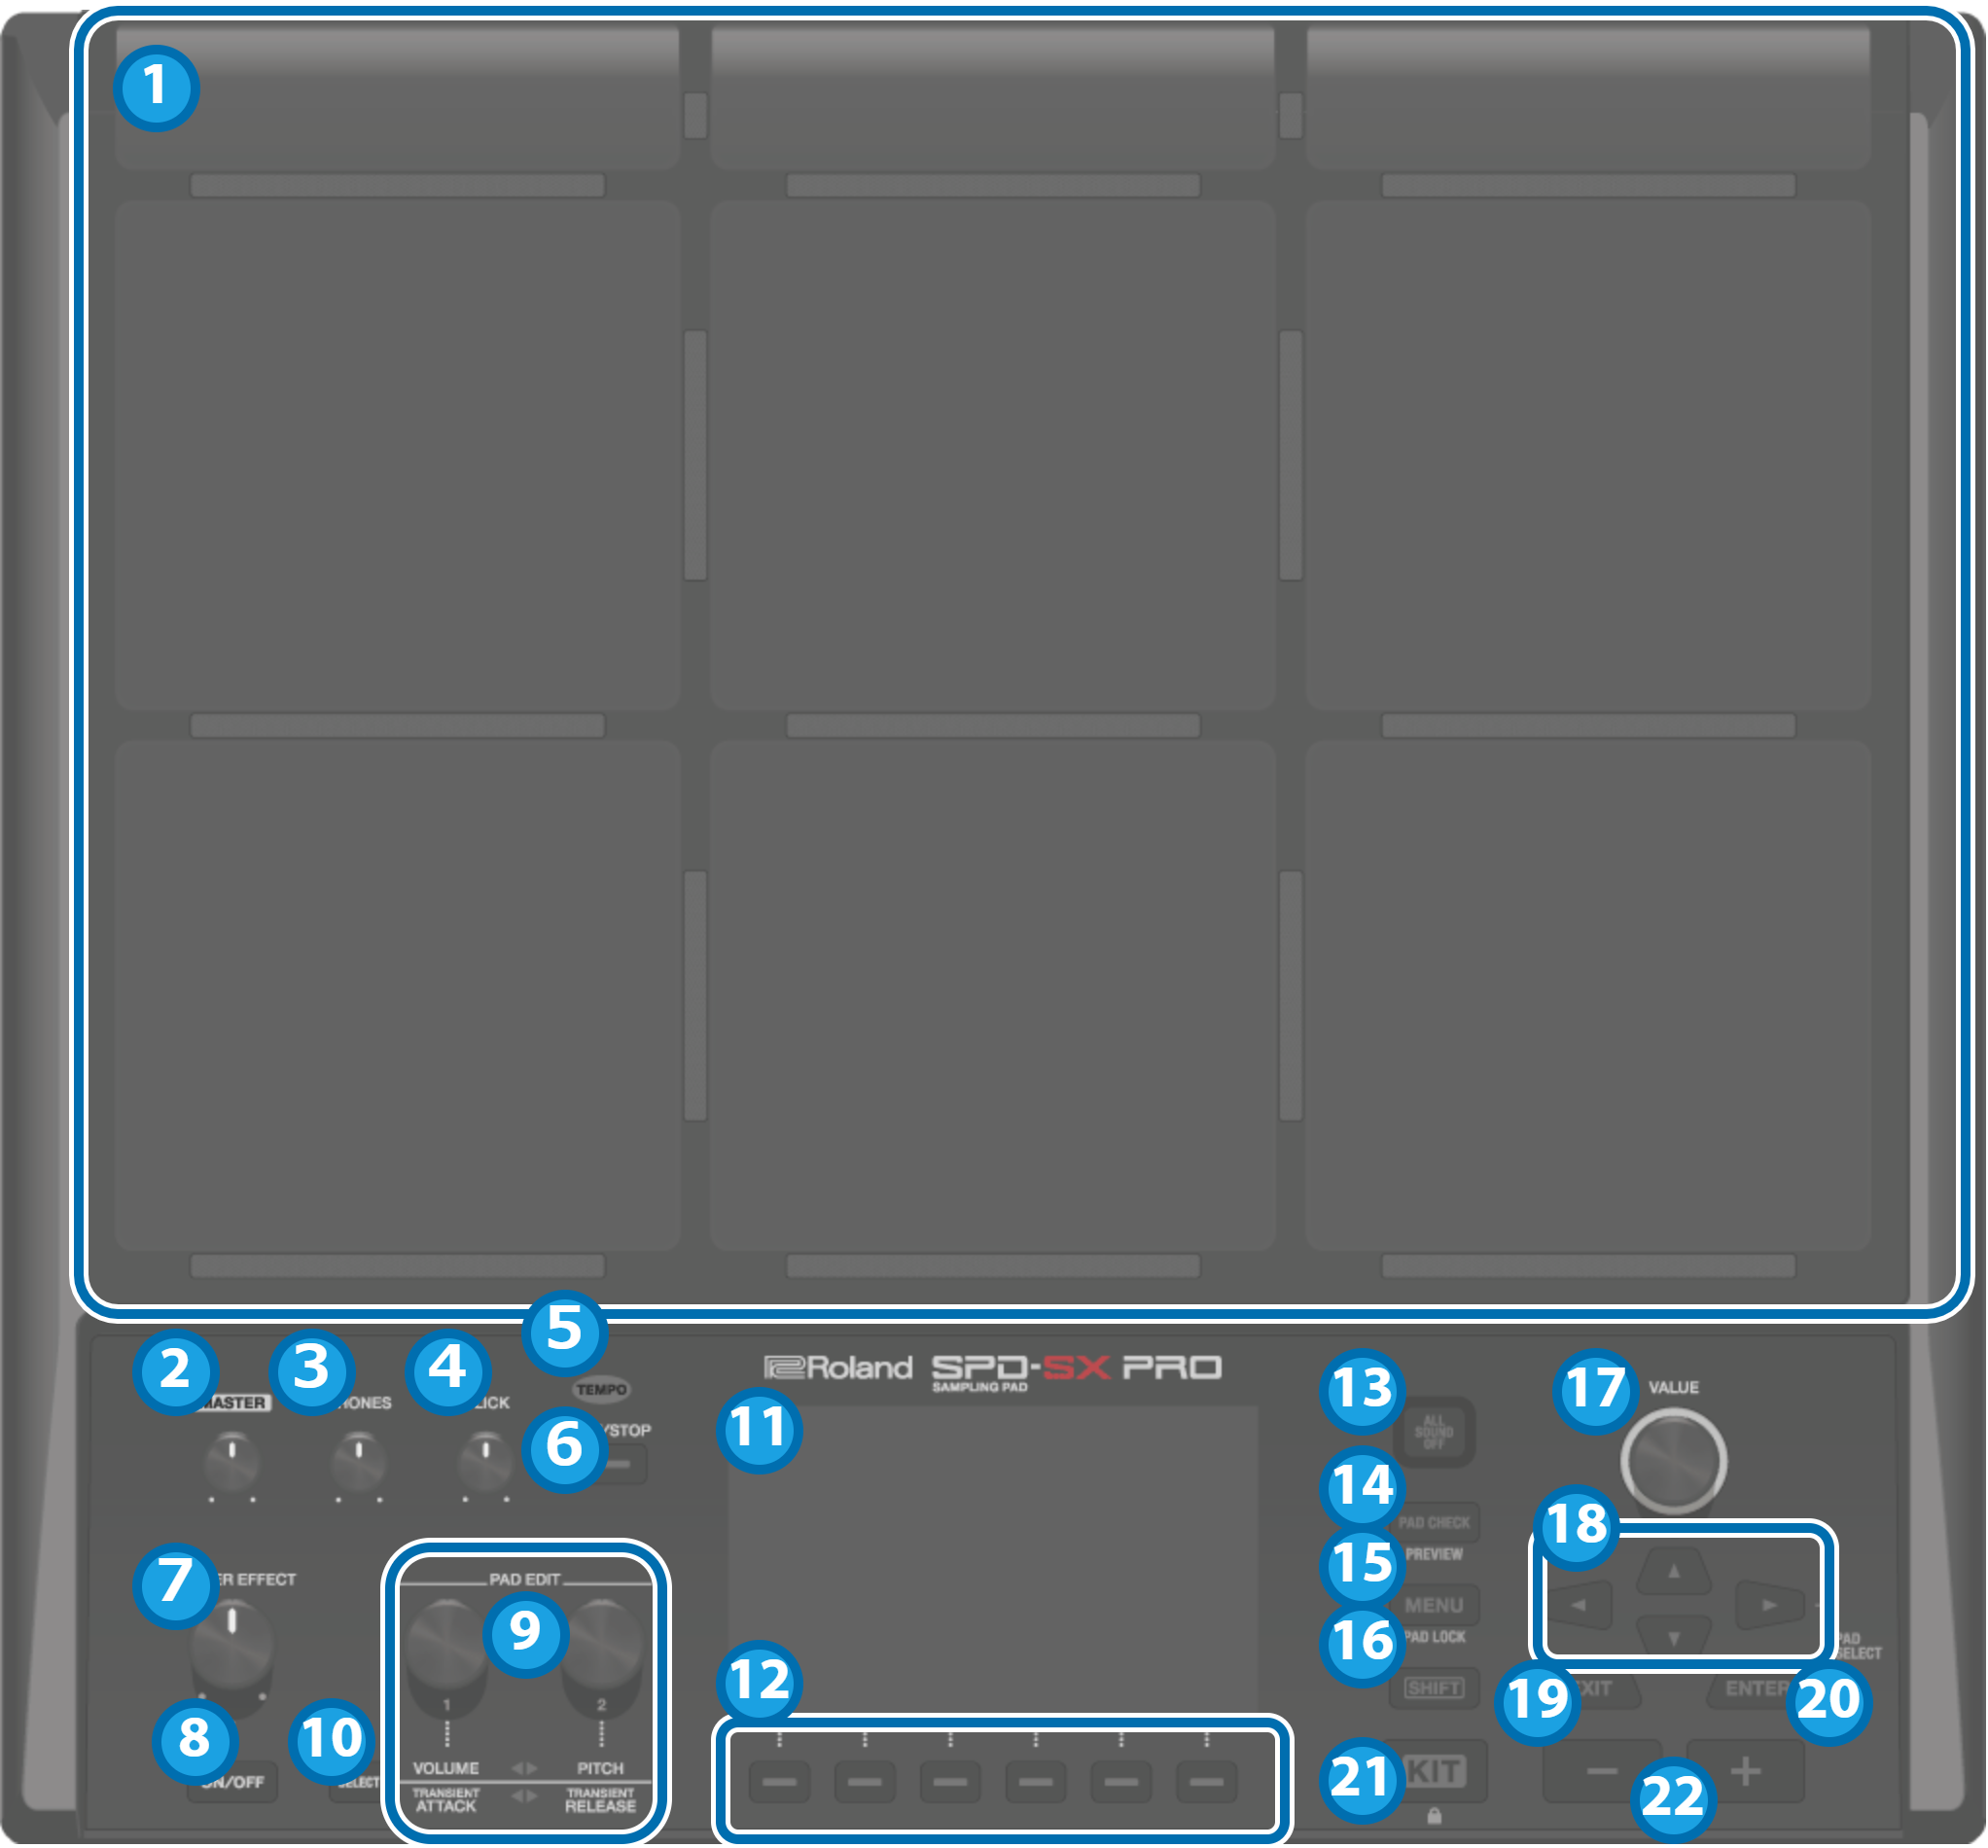
Pads [1]–[9]
Play the pads by striking them with your sticks.
The indicators below each pad (called “pad LEDs”) react when the pads are struck.[MASTER] knob
Adjusts the volume of signal from the MASTER OUT jacks.
[PHONES] knob
Adjusts the volume of signal from the PHONES jack.
[CLICK] knob
Adjusts the click volume.
TEMPO indicator
Lights up in time with the tempo that’s set.
[START/STOP] button
Starts/stops the click sound.
[MASTER EFFECT] knob
Changes the master effect.
MASTER EFFECT [ON/OFF] button
Turns the master effect on/off.
PAD EDIT [1] [2] knobs
Edits the various parameters.
[SELECT] button
Selects the target operations (the parameters to edit) for the PAD EDIT [1] [2] knobs.
[1] knob
[2] knob
Unlit
Off
Off
Top row lights
Layer Volume
Coarse Tune
Bottom row lights
Transient Attack
Transient Release
Both rows light
Assign
Assign
Display
Shows the kit name, wave name, contents of the settings and other information.
FUNCTION buttons 1–6
These buttons execute the functions shown in the display.
This guide refers to the buttons as the [F1]–[F6] buttons, in order from left to right.[ALL SOUND OFF] button
Stops all sounds that are playing.
Note that you can’t use the [ALL SOUND OFF] button to mute the effect sounds to which the MASTER effect or KIT MFX are applied (such as the delay reverberations, sounds that are looped with the looper effect and so on) or the click sound (including the click track).
[PAD CHECK] button
While you’re pressing this button, the sound from the pads you strike is only output through the PHONES jack.
Hold down the [SHIFT] button and press the [PAD CHECK] button to call up the PREVIEW function.
[MENU] button
Recalls various functions like the settings for each kit, the overall settings for this unit and so on.
[SHIFT] button
By holding down this button and then pressing another button, the function of that button changes.
[VALUE] knob
Use this knob to switch between kits and change values.
Cursor buttons
Moves the cursor.
[EXIT] button
Returns to the previous screen. This also undoes an operation.
[ENTER] button
Used for confirming a value or executing an operation.
[KIT] button
Shows the top screen (kit screen).
[-] [+] buttons
Use these to switch between kits and change values.
- You can use these buttons instead of the [VALUE] knob.
Rear Panel (Connecting Your Equipment)

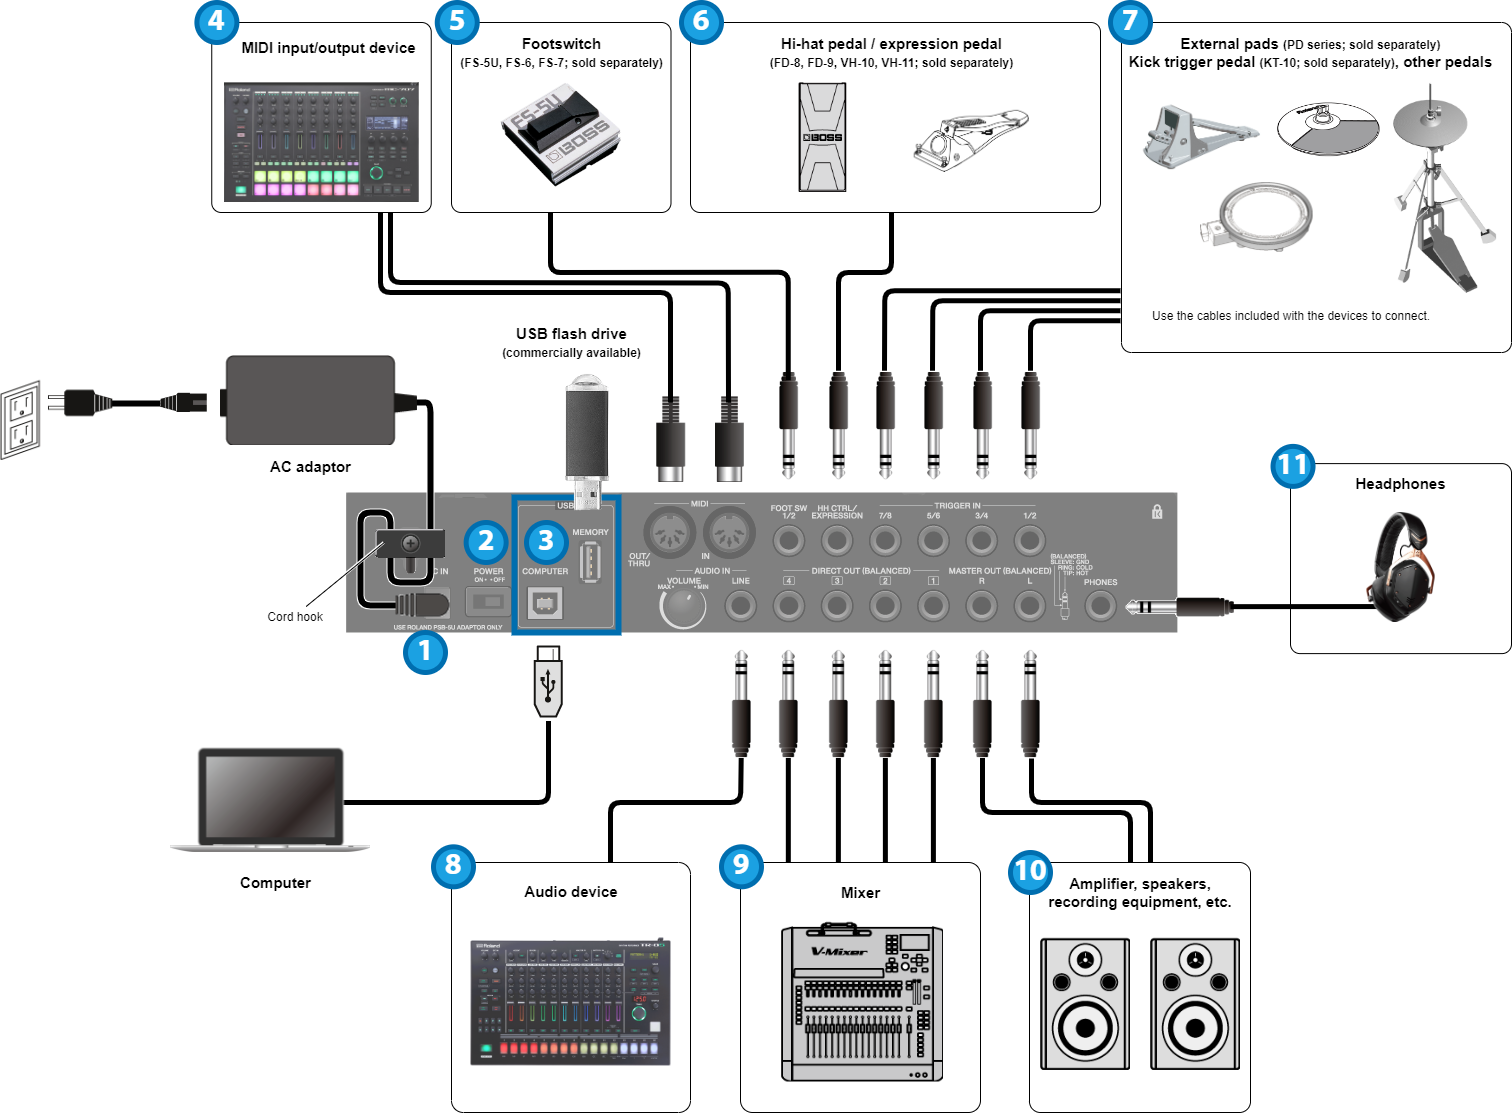
DC IN jack
Connect the included AC adaptor to this jack.
Cord hookTo prevent the inadvertent disruption of power to your unit (should the plug be pulled out accidentally), and to avoid applying undue stress to the jack, anchor the power cord using the cord hook, as shown in the illustration.
[POWER] switch
Turns the power on/off.
USB port
USB MEMORY port
Connect a USB flash drive (commercially available) to load audio data or save the settings.- Use a commercially available USB flash drive. Note that not all commercially available USB flash drives are guaranteed to work.
USB COMPUTER port
Connect your computer to this port with a USB cable.MIDI connectors
Connect devices that support MIDI input/output to exchange MIDI messages or synchronize the tempo.
FOOT SW 1/2 jack
Connect a footswitch (FS-5U, FS-6 or FS-7; sold separately) to trigger the sounds and control other parameters.
HH CTRL/EXPRESSION jack
Connect this to a hi-hat pedal (FD-8, FD-9, VH-10 or VH-11; sold separately) to control the hi-hat, or connect an expression pedal (EV-30, sold separately) to control the effect intensity and so on.
- When you operate the hi-hat pedal and expression pedal, be careful not to get your fingers pinched between the movable part and the pedal unit. When using this instrument around small children, make sure that an adult provides supervision and guidance.
- Use only the specified hi-hat pedal or expression pedal. Connecting pedals made by third-party manufacturers may cause this unit to malfunction.
TRIGGER IN 1/2, 3/4, 5/6, 7/8 jacks
Connect devices such as external pads (PD series, sold separately) or a kick trigger pedal (KT-10, sold separately) to trigger the sounds.
- Use the cables included with the external devices to connect.
AUDIO IN
Connect your audio equipment here to sample the input audio or to mix the sound from this unit with the audio.
[VOLUME] knob
Adjusts the volume of signal inputted to the LINE jack.
LINE jack
Connect a line-level device here.DIRECT OUT (BALANCED) 1–4 jacks
Connect these to your mixer or other audio equipment. This lets you output only the sound of specified pads.
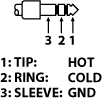
DIRECT OUT jack pin arrangement

MASTER OUT (BALANCED) L/R jacks
Connect these to your amp, speakers, recording equipment and other devices for sound output.
MASTER OUT jack pin arrangement

PHONES jack
Connect your headphones here. Use the [PHONES] knob to adjust the volume.