Here’s how to configure the basic settings, such as selecting the waves that each pad plays, adjusting the pad volume and so forth.
- Select [MENU] Ó ”KIT EDIT1”.
Use the cursor [à] [á] [ã] [â] buttons to select “PAD EDIT” and press the [ENTER] button.
The PAD EDIT screen appears.
There are five different PAD EDIT screen pages.- Hold down the [SHIFT] button and press the cursor [à] [á] buttons to move between pages.
Setting the play type (PAD EDIT - PLAY TYPE)
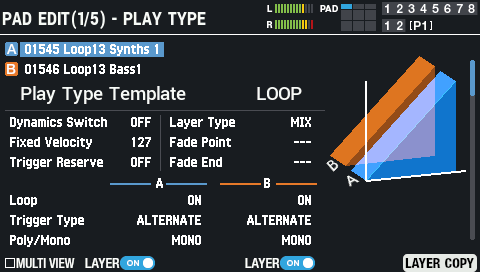
Use the cursor [à] [á] [ã] [â] buttons to select a parameter, and use the [-] [+] buttons to edit the value.
Parameter |
Value |
Explanation |
|---|---|---|
| Play Type Template | SINGLE, PHRASE, LOOP, HI-HAT |
Sets how the wave plays.
SINGLE: Select this when playing single sounds like the kick, snare, clap and so on. |
| Dynamics Switch | OFF, ON | ON: Changes the volume according to the “Dynamics Curve” settings, in response to how hard you strike the pads. |
| Dynamics Curve | LINEAR, LOUD1, LOUD2, LOUD3 |
When this is set to “LINEAR”, the sound changes volume naturally according to how hard you strike the pads. When this is set to “LOUD 1” through “LOUD 3”, louder sounds are more readily produced. |
| Fixed Velocity | 1–127 | When “Dynamics Switch” is OFF, this sets the velocity value at which the waves are played. |
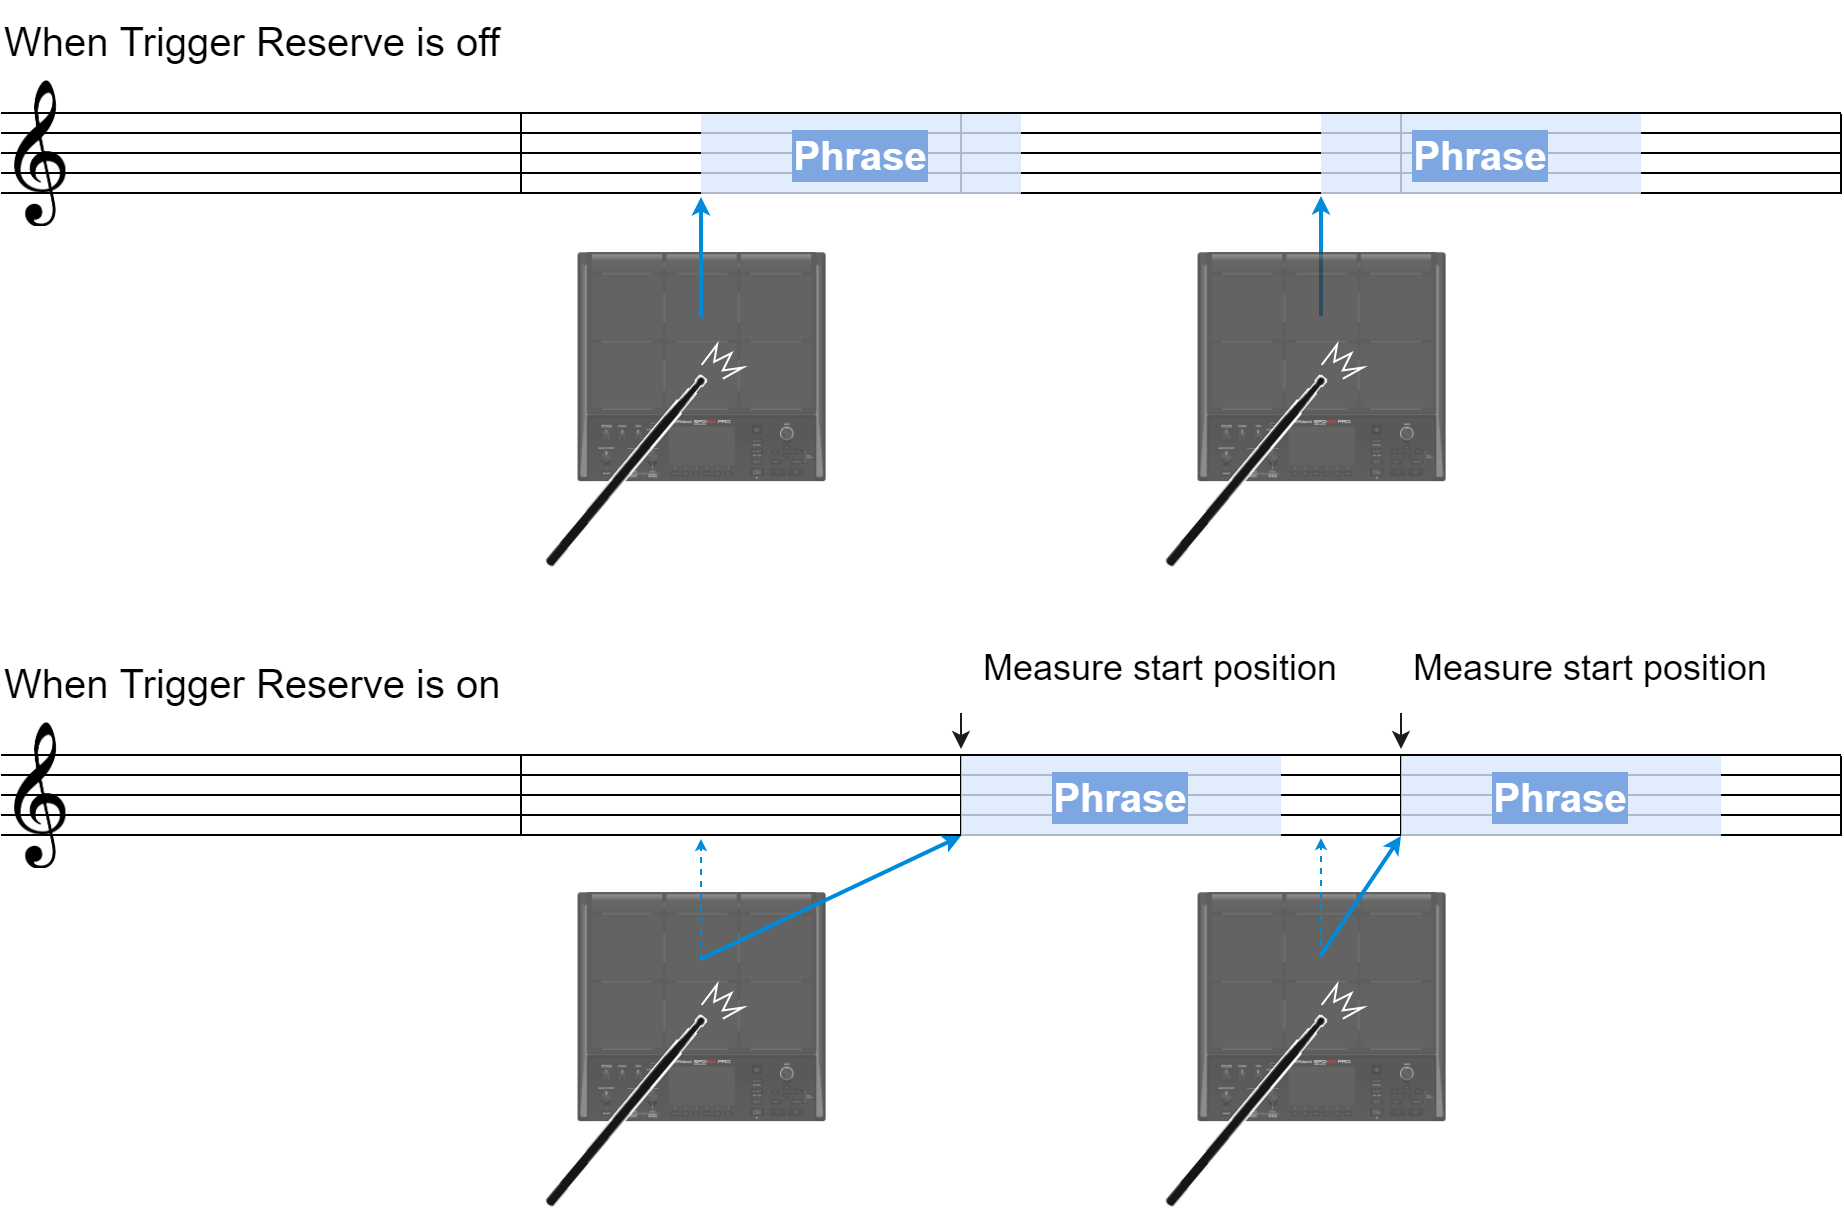
| Trigger Reserve | OFF, ON |
When this is “ON”, you can play the pad ahead of the click accent timing to “reserve” the note.
|
| Layer Type | MIX, FADE1, FADE2, XFADE, |
MIX: The waves for layer A and layer B are always played together as a layer. |
| Fade Point | 1–127 | Sets the force of the strike at which layer B begins to sound. With a “1” setting, layer B plays regardless of how hard you strike the pad. |
| Fade End | 1–127 | Sets the end point of the fade or crossfade range when the Layer Type is “FADE2” or “XFADE”. |
LAYER A/B
Parameter |
Value |
Explanation |
|---|---|---|
Loop |
OFF, ON, X2, X4, X8 |
Sets how many times a wave repeats. |
Trigger Type |
ONESHOT, ALTERNATE |
Sets how the waves play back when you strike the pad. |
Poly/Mono |
POLY, MONO |
Sets whether the waves play in polyphonic or monophonic mode. |
Button |
Explanation |
|---|---|
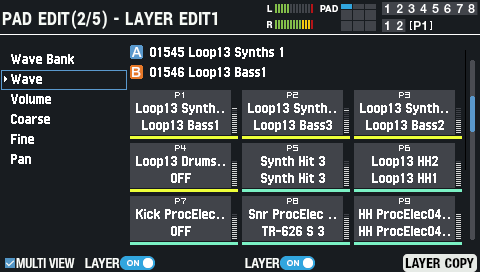
[F1] (MULTI VIEW) |
When the check box is selected, the setting value for the selected parameter is shown in the list of pads at right. This is useful when you want to set a parameter such as the volume for each layer, all at once.
|
[F2] (LAYER) |
Turns layer A on/off. |
[F4] (LAYER) |
Turns layer B on/off. |
[F6] (LAYER COPY) |
Copies or swaps a layer. |
[SHIFT] + [F5] (PAD INIT) |
Initializes the selected pad. |
[SHIFT] + [F6] (PAD COPY) |
Copies a pad. |
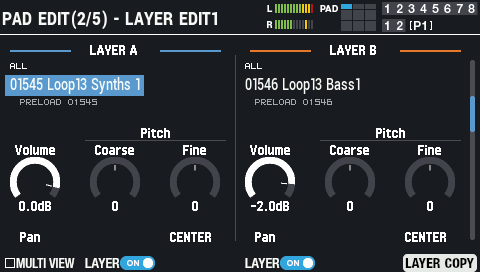
Layer settings 1 (PAD EDIT - LAYER EDIT1)
LAYER A/B
Parameter |
Value |
Explanation |
||
|---|---|---|---|---|
Wave Bank |
ALL, PRELOAD, USER |
Selects the category for waves to select. ALL: Both PRELOAD and USER categories |
||
Wave |
0–20000 |
Selects a sound from a maximum of 20,000 waves. When “0” (OFF) is selected, no wave is assigned.
|
||
Volume |
-INF–+6.0 dB |
Adjusts the volume. |
||
Pitch Coarse |
-12–+12 |
Adjusts the pitch (in semitones).
|
||
Pitch Fine |
-50–+50 |
Adjusts the pitch (in cents). |
||
Pan |
L15–CENTER–R15 |
Adjusts the pan (left-right balance). |
WAVE SELECT window
- If the cursor is positioned at “Wave” in the PAD EDIT - LAYER EDIT1 screen, press the [ENTER] button.
The WAVE SELECT window appears.
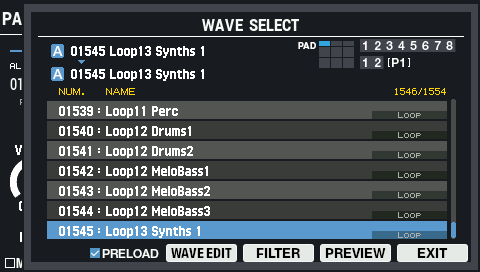
Use the cursor [à] [á] buttons to select the wave.
Button Explanation [F2] (PRELOAD) When the check box is selected, all samples are shown including preload samples.
When the check box is deselected, the preload samples are not shown.[F3] (WAVE EDIT) The WAVE EDIT screen appears.
Editing a Wave (WAVE EDIT)[F4] (FILTER) The TAG FILTER window appears.
Filtering Wave Lists by Tags (FILTER)[F5] (PREVIEW) Previews the selected sample. [F6] (EXIT) Closes the WAVE SELECT window. Press the [F6] (EXIT) button to close the WAVE SELECT window.
Layer settings 2 (PAD EDIT - LAYER EDIT2)
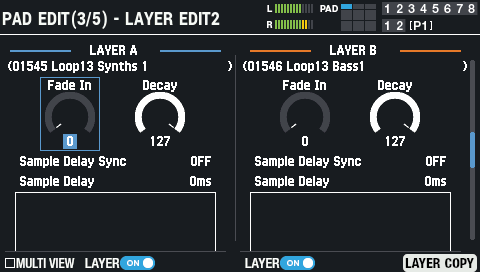
Parameter |
Value |
Explanation |
|---|---|---|
Fade In |
0–127 |
Adjusts the time it takes for the original peak value (volume) to be reached once the wave starts playing. |
Decay |
0–127 |
Adjusts the wave decay time.
|
Sample Delay Sync |
OFF, TEMPO SYNC |
You can add a delay that occurs before the sound actually plays after you strike a pad. |
Sample Delay |
0–5000 ms |
Sets how much time it takes for the sound to be heard (the delay time) after you strike the pad. |
| 1/64T(ŗ), 1/64(ō), 1/32T(Ŗ), 1/32(Ō), 1/16T(ŕ), 1/32.(ŋ), 1/16(Ŋ), 1/8T(Ŕ), 1/16.(ʼn), 1/8(ň), 1/4T(œ), 1/8.(Ň), 1/4(ņ), 1/2T(Œ), 1/4.(Ņ), 1/2(ń), 1/1T(ő), 1/2.(Ń), 1/1(ł), 2/1T(Ő), 1/1.(Ł), 2/1(ŀ) (when Sample Delay Sync is “TEMPO SYNC”) |
EQ settings (PAD EDIT - LAYER EQ)
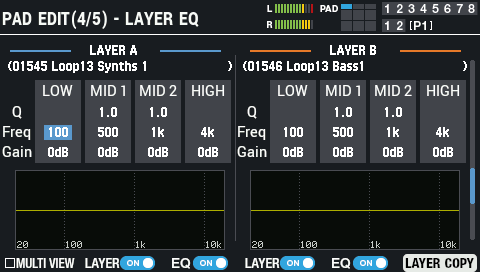
Parameter |
Value |
Explanation |
|---|---|---|
LOW Freq |
20 Hz–1 kHz |
Center frequency of the low range |
LOW Gain |
-24–+24 dB |
Amount of low range boost/cut |
MID1 Q |
0.5–16 |
The width of midrange band 1. Higher values make the width more narrow. |
MID1 Freq |
20 Hz–16 kHz |
Center frequency of midrange band 1 |
MID1 Gain |
-24–+24 dB |
Amount of boost/cut for midrange band 1 |
MID2 Q |
0.5–16 |
The width of midrange band 2. Higher values make the width more narrow. |
MID2 Freq |
20 Hz–16 kHz |
Center frequency of midrange band 2 |
MID2 Gain |
-24–+24 dB |
Amount of boost/cut for midrange band 2 |
HIGH Freq |
1 kHz–16 kHz |
Center frequency of the high range |
HIGH Gain |
-24–+24 dB |
Amount of high range boost/cut |
Button |
Explanation |
|---|---|
[F1] (MULTI VIEW) |
Shows the pad status as a list. |
[F2] (LAYER) |
Turns layer A on/off. |
[F3] (EQ) |
Turns the layer A equalizer on/off. |
[F4] (LAYER) |
Turns layer B on/off. |
[F5] (EQ) |
Turns the layer B equalizer on/off. |
[F6] (LAYER COPY) |
Copies or swaps a layer. |
[SHIFT] + [F5] (PAD INIT) |
Initializes the selected pad. |
[SHIFT] + [F6] (PAD COPY) |
Copies a pad. |
Transient settings (PAD EDIT - LAYER TRANSIENT)
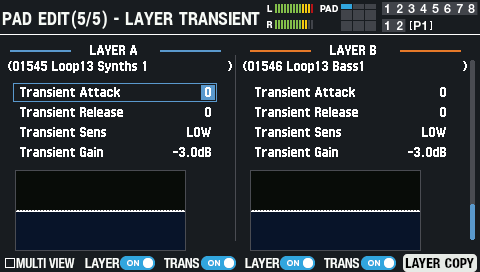
Parameter |
Value |
Explanation |
|---|---|---|
Transient Attack |
-50–50 |
Use this to emphasize or de-emphasize the attack portion of the sound. |
Transient Release |
-50–50 |
Use this to emphasize or de-emphasize the release portion of the sound. |
Transient Sens |
ULOW, LOW, MID, HIGH |
Adjusts the transient sensitivity. |
Transient Gain |
-INF–+6.0 dB |
Adjusts the volume after transient adjustment. |
Button |
Explanation |
|---|---|
[F1] (MULTI VIEW) |
Shows the status of pads 1–9 as a list. |
[F2] (LAYER) |
Turns layer A on/off. |
[F3] (TRANS) |
Turns the layer A transient on/off. |
[F4] (LAYER) |
Turns layer B on/off. |
[F5] (TRANS) |
Turns the layer B transient on/off. |
[F6] (LAYER COPY) |
Copies or swaps a layer. |
[SHIFT] + [F5] (PAD INIT) |
Initializes the selected pad. |
[SHIFT] + [F6] (PAD COPY) |
Copies a pad. |
